[ad_1]
Issues are transferring proper alongside on the cupboards for the workplace space of my studio! We had beautiful climate yesterday, and I took benefit of it by getting all the trim for the doorways and drawer fronts minimize, assembled, and hooked up to the doorways and drawer fronts. I bought all 18 trimmed out and prepared for the subsequent step.

It’s alleged to be sunny and 79 levels immediately, so I had hoped to get all the trim caulked in order that I may paint immediately. Sadly, I ran out of time, and didn’t get any of the caulking completed yesterday, in order that should be completed immediately. Our climate is meant to be stunning all week, so it’s trying like I’ll be capable to paint on Thursday. As soon as I get that completed, I’ll really feel such an enormous sense of accomplishment!
I had thought-about skipping the caulking course of and simply portray the doorways and drawer fronts, however I simply can’t let myself do this. You’ll be able to see right here that the trim I used is barely curved even on the bottom. So proper the place it sits in opposition to the door, you possibly can see this little crevice.

Issues like that irritate the heck out of me, and there’s no method I’d be happy with out caulking that little crevice. And the mitered corners of the trim additionally want just a little sanding and caulking.

Anyway, that is spherical two of me prepping, including trim, caulking, priming, portray, and gold leafing IKEA Veddinge cupboard doorways and drawer fronts, and I wrote about it in higher element the primary go ’spherical.
So now that I’m nicely on my strategy to getting the doorways and drawer fronts completed, I’ve been considering forward and planning how I’m going to complete out the precise cupboard bins. The uncovered facet on the suitable should be coated, and since I didn’t purchase any of these panels from IKEA, I’ll be utilizing MDF or plywood.
I’ll mainly be repeating the exact same course of I used to construct out the perimeters of the paint swatch cupboard the place I added added two items of two″ x 2″ lumber to the perimeters of the cupboards like this…

After which coated that with a chunk of plywood like this…

Since I’ve already completed that course of as soon as, and it labored out nice, there’s not likely anything to determine. I’ll simply repeat that complete course of to cowl over the suitable facet of the cupboards. However one factor I’ve been contemplating is including a bridge to attach the 2 higher sections.
I’ve been toying with this concept actually from the very starting of designing this room again in 2017, however another person instructed it a couple of posts again once I requested for concepts on the right way to incorporate the floral design on this space of the room. Somebody instructed constructing that bridge to attach the highest higher cupboards, after which simply including the floral wallpaper to the wall in that enclosed space.
For those who’re having a tough time envisioning this, let me present you what I’m speaking about. So right here’s the plan I’ve been displaying y’all for some time now. Though the design modified barely once I determined to go along with IKEA cupboards, the primary thought has been the identical since 2017.

However the bridge thought would look one thing like this…
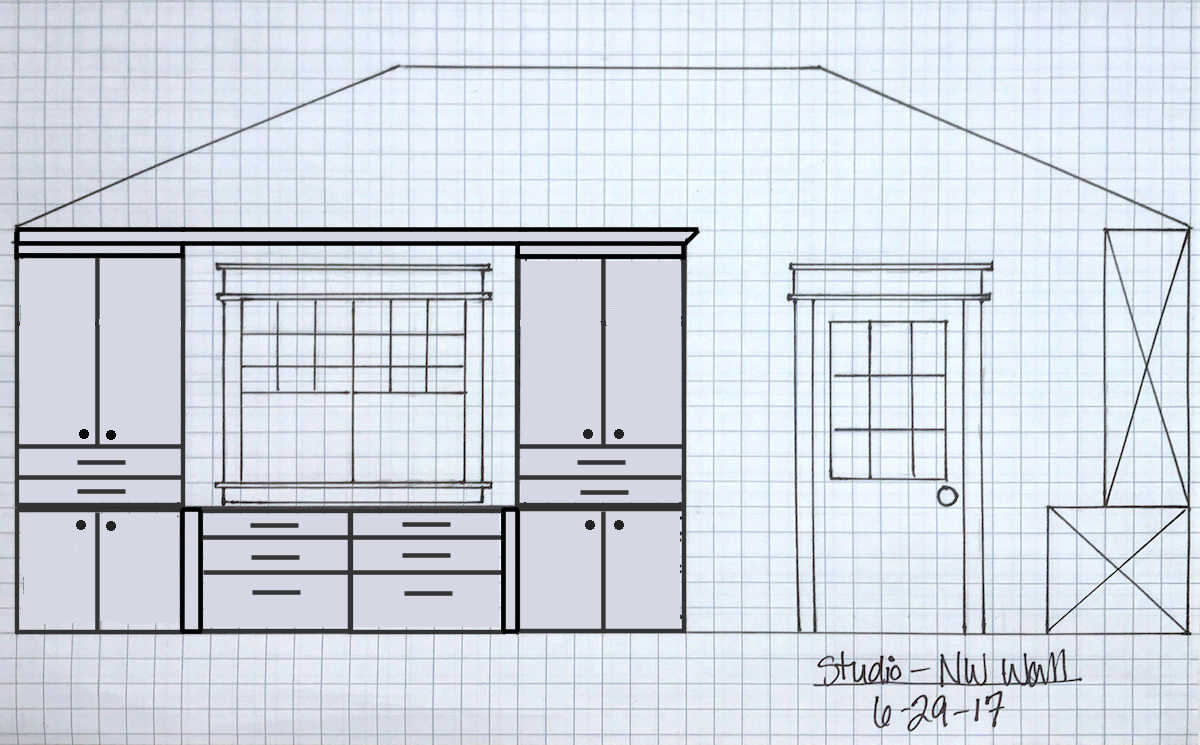
I don’t plan so as to add the floral wallpaper to the realm inside that space as a result of I don’t assume sufficient of it will present to be definitely worth the effort. However what I do love concerning the bridge thought is that I may add lights above that countertop. I don’t know if I’d ever want lights in that space, or what sort of work I’d do on that countertop that may necessitate lighting above it, however I do like the concept of getting it out there if and once I want it.
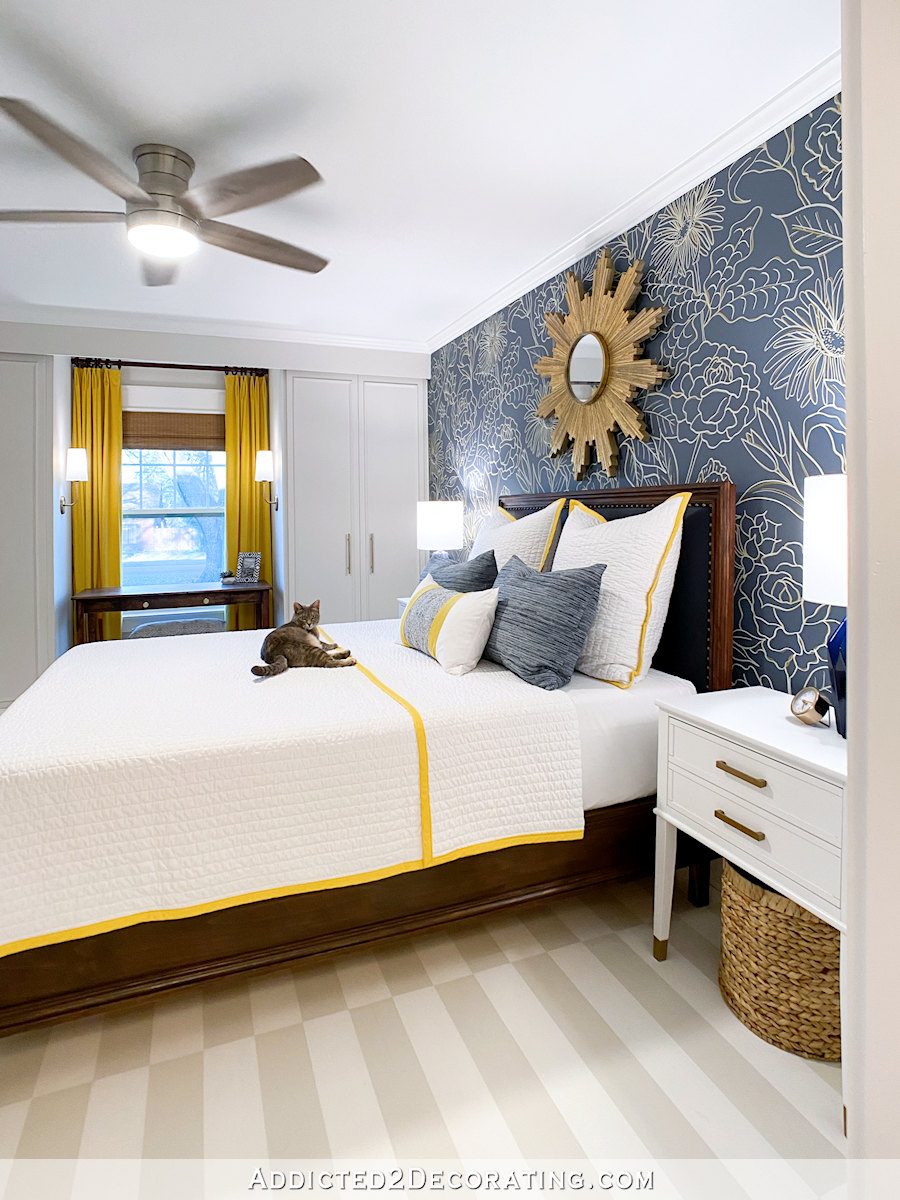
In fact, if I didn’t do the bridge, I may all the time add sconces to the perimeters of the cupboards, going through the window, identical to I did with the closets in our visitor bed room.
I additionally like that the bridge offers the cupboards a extra completed look (in my humble opinion) in opposition to that very tall, broad wall. With the bridge, all the cupboard space seems like a extra cohesive unit to my eye.
In order that’s actually the primary design determination I’m attempting to resolve on proper now. I’ve a couple of days to resolve since I’m specializing in the doorways and drawer fronts proper now. These will most likely take me the remainder of the week, and perhaps even the weekend, since I’ve to do the gold leaf additionally. However I’m hoping that I’ll be prepared to start out on the precise cupboards subsequent week, and I have to have that call made so I’ll be able to go.
What would you do? Add a bridge with crown molding for lighting? Or forgo the bridge and simply add crown molding to the tops of every particular person higher cupboard, and presumably add some sconces to the perimeters of the cupboards?

Addicted 2 Adorning is the place I share my DIY and adorning journey as I transform and adorn the 1948 fixer higher that my husband, Matt, and I purchased in 2013. Matt has M.S. and is unable to do bodily work, so I do nearly all of the work on the home on my own. You’ll be able to study extra about me right here.
[ad_2]
Source link
