[ad_1]
DIY tasks have change into more and more fashionable in recent times, permitting people to unleash their creativity and create distinctive items for his or her properties. One such venture that has gained vital consideration is crafting a surprising DIY desk with actual flowers and epoxy resin. This fascinating mixture of pure components and fashionable supplies can remodel a easy desk right into a murals. On this step-by-step information, we’ll discover the method of making your very personal flower and epoxy desk, from choosing the supplies to including the ending touches.

Supplies wanted for creating a surprising DIY desk
Earlier than diving into the creation course of, it’s important to assemble all the mandatory supplies. Right here’s a listing of things you’ll want:
- A desk: Select a sturdy desk with a flat floor that can function the canvas in your floral masterpiece.
- Epoxy resin: Go for a high-quality epoxy resin that’s designed for tabletops. It will guarantee a sturdy and long-lasting end.
- Dried flowers: Choose quite a lot of dried flowers that complement your aesthetic imaginative and prescient. Contemplate the colour palette and the scale of the flowers.
- Mixing instruments: You’ll want mixing cups, stir sticks, and a torch or warmth gun for eradicating air bubbles.
- Protecting gear: Guarantee your security by sporting gloves, goggles, and a respirator masks to guard your self from the fumes emitted in the course of the resin utility.
Photographs & Video: EPIC ARTRESIN
Step 1: Making ready the desk floor
Begin by making ready the desk floor to make sure a clean and even end. Clear the desk completely, eradicating any grime or particles. Sand the floor gently to create a barely tough texture, which is able to assist the resin adhere higher. Wipe away the mud with a moist material and let the desk dry utterly.
Step 2: Choosing and making ready the flowers for resin
The selection of flowers is essential in making a visually gorgeous and cohesive design. Choose quite a lot of dried flowers that complement one another when it comes to colour, form, and measurement. Contemplate the general aesthetic you want to obtain, whether or not it’s a vibrant burst of colours or a chic monochromatic look.
Earlier than incorporating the flowers into the resin, it’s important to organize them correctly. Trim the stems and take away any extra leaves. Organize the flowers in a approach that showcases their magnificence and enhances the general composition. Take your time throughout this step, because the association will considerably influence the ultimate outcome.
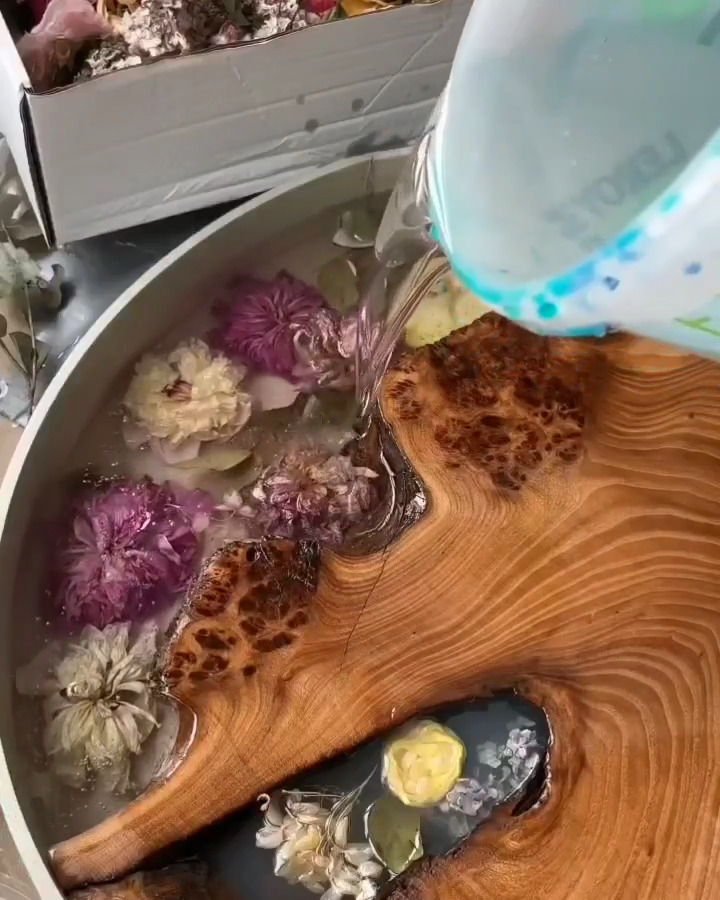
Step 3: Mixing and pouring the epoxy resin
Now it’s time to combine and pour the epoxy resin onto the ready desk floor. Observe the producer’s directions rigorously to realize the specified ratio of resin and hardener. Use a stir stick to combine the elements completely, guaranteeing they’re properly mixed.
As soon as the resin is combined, pour it onto the desk floor in a gradual and managed method. Begin from the middle and permit the resin to stream naturally in direction of the sides. Use a spreader or a brush to evenly distribute the resin, guaranteeing it covers the complete floor.
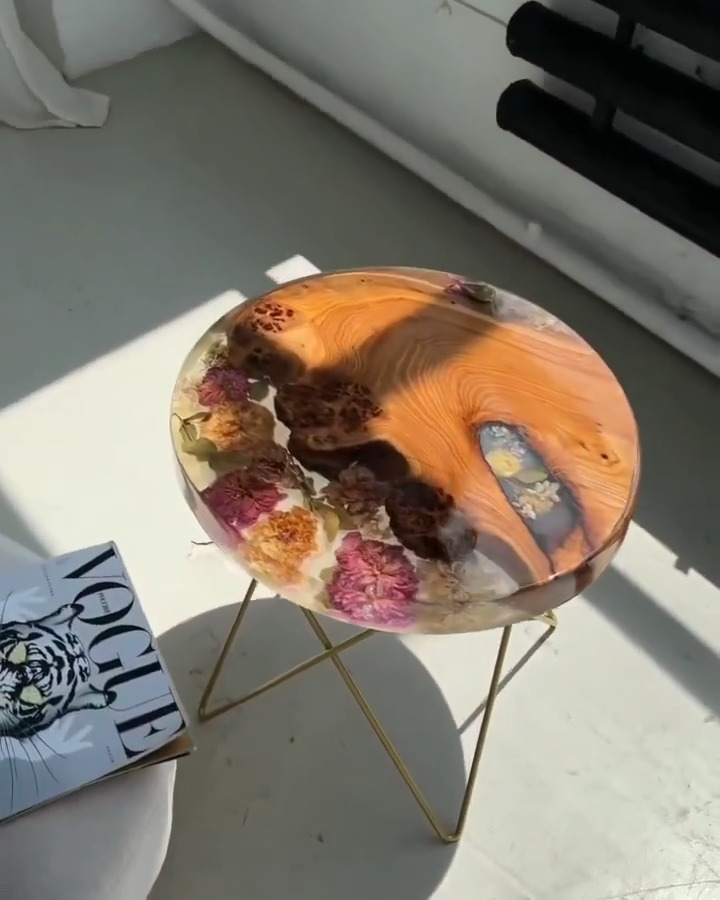
Step 4: Arranging the flowers on the desk floor
With the resin poured, it’s time to rearrange the rigorously ready flowers on the desk floor. Gently place the flowers onto the resin, taking care to not press them too laborious, as this will trigger them to sink or lose their form. Experiment with completely different placements till you obtain a composition that pleases your eye.
Take a second to step again and assess the association from completely different angles. Make any vital changes to make sure a balanced and visually interesting design. As soon as you’re happy with the flower placement, gently press them down into the resin to safe them in place.
Step 5: Making use of the second layer of epoxy resin
To create depth and shield the flowers, it is strongly recommended to use a second layer of epoxy resin. It will encapsulate the flowers and supply a shiny and sturdy end. Observe the identical mixing and pouring course of as in Step 3, guaranteeing that the resin covers the flowers totally.
Use a spreader or a brush to distribute the resin evenly and take away any air bubbles that will have shaped. A torch or warmth gun can be utilized to rigorously move over the floor, eliminating any remaining bubbles and making a clean end.
Step 6: Ending touches and curing the resin
Because the second layer of resin cures, it’s time so as to add the ending touches to your DIY flower and epoxy desk. Examine for any imperfections or uneven areas and make vital corrections, similar to sanding or filling in gaps. As soon as you’re happy with the outcome, enable the resin to treatment in keeping with the producer’s directions.
Curing instances might differ relying on the kind of epoxy resin used, so be affected person and keep away from shifting or utilizing the desk till the resin has totally cured. It will guarantee a powerful and sturdy end that can final for years to return.
Suggestions and methods for a profitable DIY flower and epoxy desk
- Experiment with completely different flower preparations earlier than committing to a design.
- Use contrasting colours to create a visually placing impact.
- Contemplate including further components similar to leaves or small branches to boost the pure really feel.
- Take correct security precautions when working with epoxy resin, together with sporting protecting gear and dealing in a well-ventilated space.
- Clear your instruments and workspace instantly after finishing the venture to forestall the resin from hardening and inflicting harm.
Upkeep and care in your gorgeous DIY desk
To maintain your DIY flower and epoxy desk wanting its greatest, comply with these upkeep suggestions:
- Clear the desk often utilizing a smooth material and delicate cleaning soap. Keep away from abrasive cleaners that may harm the resin.
- Shield the desk from direct daylight, as extended publicity may cause the colours to fade over time.
- Use coasters or placemats to forestall scorching or sharp objects from scratching or damaging the resin floor.
- Keep away from putting heavy objects on the desk, as this will trigger the resin to crack or chip.
- If any harm happens, seek the advice of knowledgeable to restore the desk and restore its authentic magnificence.
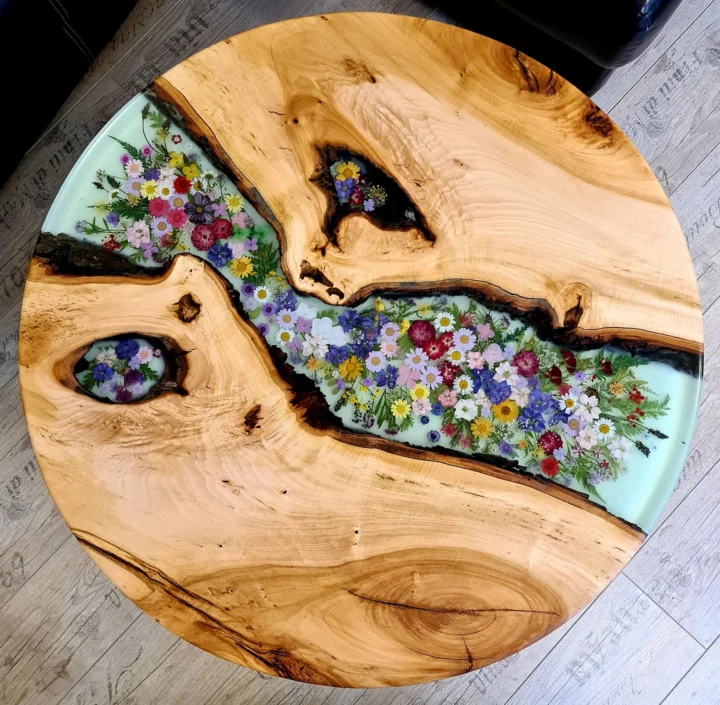
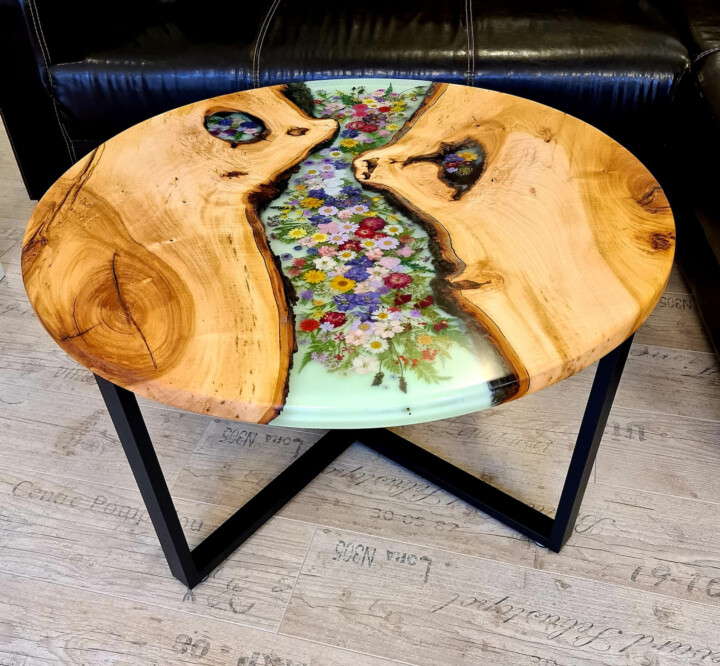
Inspiring concepts and variations for flower and epoxy tables
The probabilities for creating distinctive flower and epoxy tables are infinite. Listed here are just a few inspiring concepts to get your artistic juices flowing:
- Incorporate various kinds of dried flowers, similar to lavender, rose petals, or child’s breath, for a romantic and delicate look.
- Experiment with including different pure components, similar to seashells or moss, to create a whimsical and nature-inspired design.
- Use a mixture of vibrant and bold-colored flowers to create an announcement piece that provides a pop of colour to any room.
- Create a personalised design by arranging flowers within the form of initials or significant symbols.
Keep in mind, the one restrict is your creativeness!
Conclusion and closing ideas
Picture: Epoxy resin spherical espresso desk
Crafting a surprising DIY desk with actual flowers and epoxy resin is a rewarding and artistic venture that means that you can showcase your creative aptitude. By following this step-by-step information, you possibly can create a singular piece of furnishings that shall be a real dialog starter in your house. Keep in mind to take your time, experiment with completely different designs, and above all, have enjoyable all through the method. So, collect your supplies, let your creativity blossom, and embark on this thrilling DIY journey. Your gorgeous flower and epoxy desk awaits!
Associated
[ad_2]
Source link
