[ad_1]
Our laundry/mud room was the primary room that we ever utterly gutted once we moved into our house. It was additionally the primary room I ever utterly designed from scratch. Over time, and a pair of extra children later, we realized we wanted it to perform a bit in another way for us. So we determined to offer it one other replace. This time utilizing our extra seasoned DIY abilities and design information to create an area that is filled with type and performance. Together with DIY Constructed ins and hidden shoe storage.
THE BEFORES
Let’s take a stroll down reminiscence lane and take a look at the place we first began once we moved in. It was fairly dangerous, however Dan’s dad was residing right here all by himself and actually didn’t care what it regarded like.
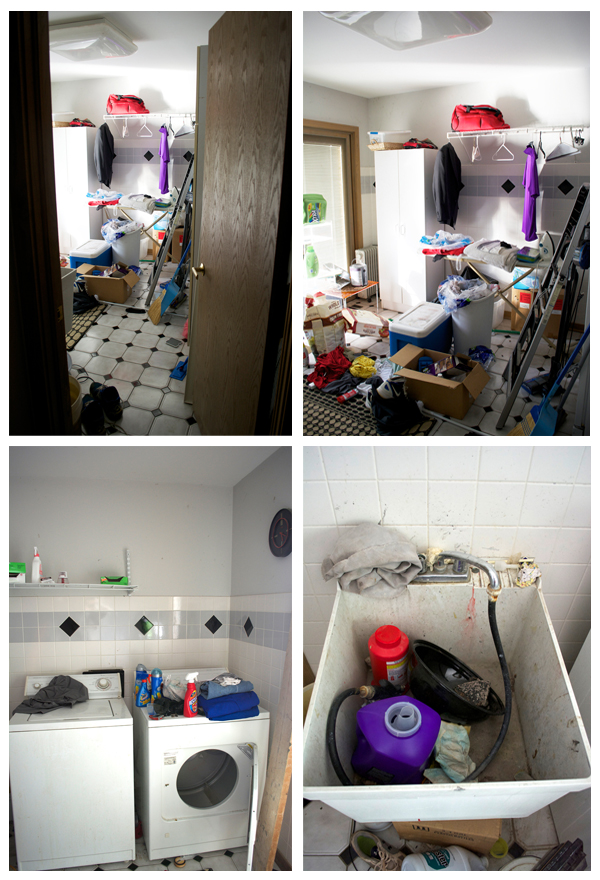
That’s why this was the primary room we tackled once we moved in since he had no emotional attachment to it…in contrast to another rooms in the home ?
This was the way it sorted we accomplished it for the One Room Problem again in 2016.
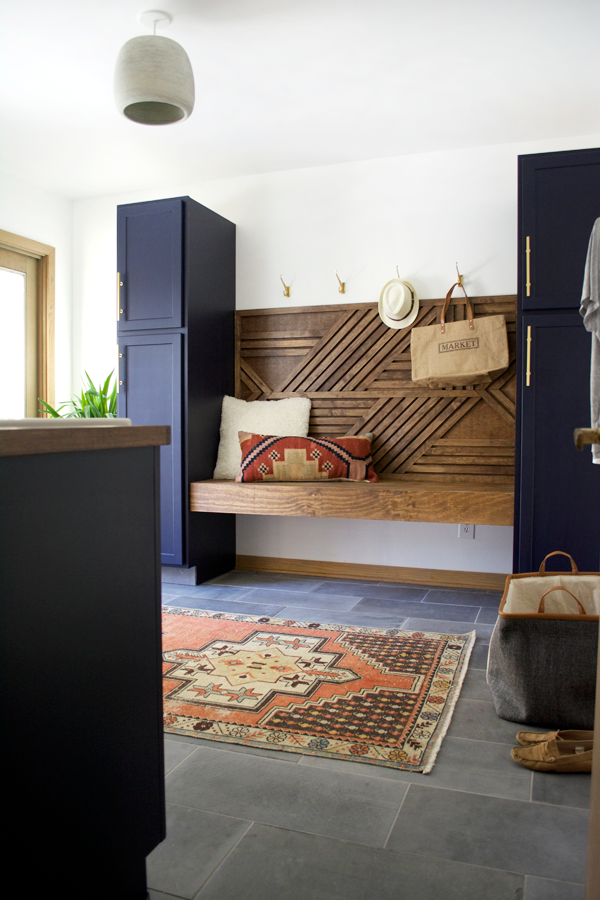
Over time, I’ve modified the decor a bit and gave it somewhat refresh, however the principle bones have all the time stayed the identical.
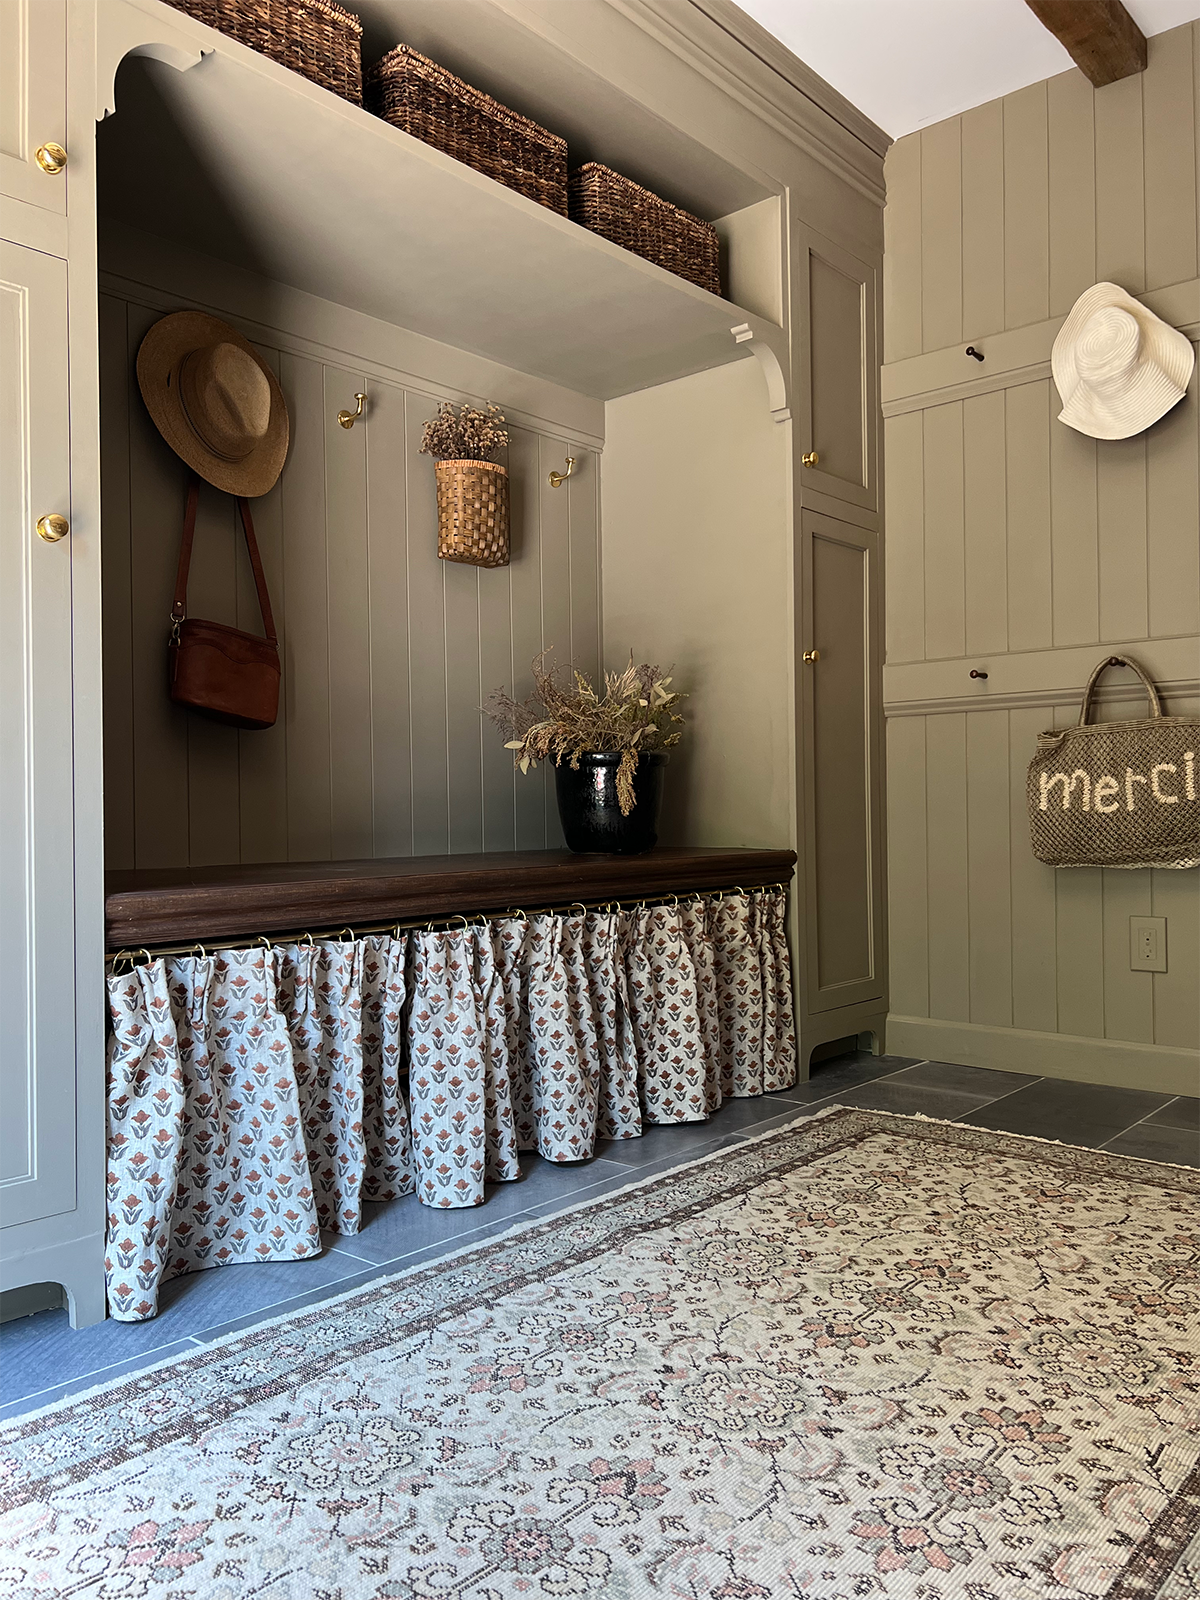
Now that we have now 3 children, we realized this area wasn’t getting used to it’s most potential. Our shoe storage was utterly missing and a sizzling mess – I knew I needed some hidden shoe storage. The youngsters couldn’t actually attain the hooks to hold any of their stuff and my type has developed and I used to be simply prepared for a change.
THE WALLS: SHIPLAP PANELING
One of many best methods so as to add visible curiosity and character to your partitions is by hanging shiplap. In case you purchase singular boards although, it will probably get dear actual fast. We used these shiplap panels from Lowe’s which have been less expensive however nonetheless provide the similar look. You simply have to chop them to dimension on the desk noticed the place wanted.
We hung this on each wall that was simply drywall, together with behind the bench and it actually helped the room really feel extra cohesive.
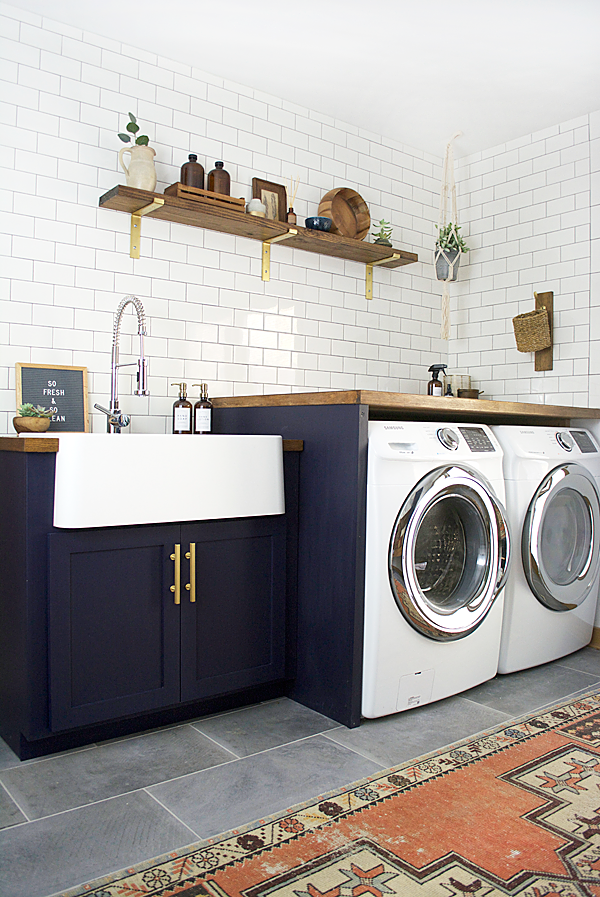
THE COLOR: MOUSES BACK BY FARROW & BALL
For years I’ve thought of altering the colour of the cupboards in right here however by no means took the plunge. So once we lastly determined to do that replace it was go time. I sampled a number of colours from Farrow & Ball and ended up selecting Mouses Again which is essentially the most lovely mild brown, beige shade. Don’t let the humorous identify throw you off, it’s completely gorgeous!

We used their new Useless Flat end which is strictly what it appears like: very flat. And I often wouldn’t select a flat end for such a excessive visitors space however this paint was meant for precisely that. It’s sturdy, scrubbable and scratch resistant so I felt assured placing it someplace I knew grubby little fingers could be always touching.
It’s additionally multi-surface which is nice as a result of it may be painted on partitions, woodwork and steel. No must tape off – simply paint all of it!
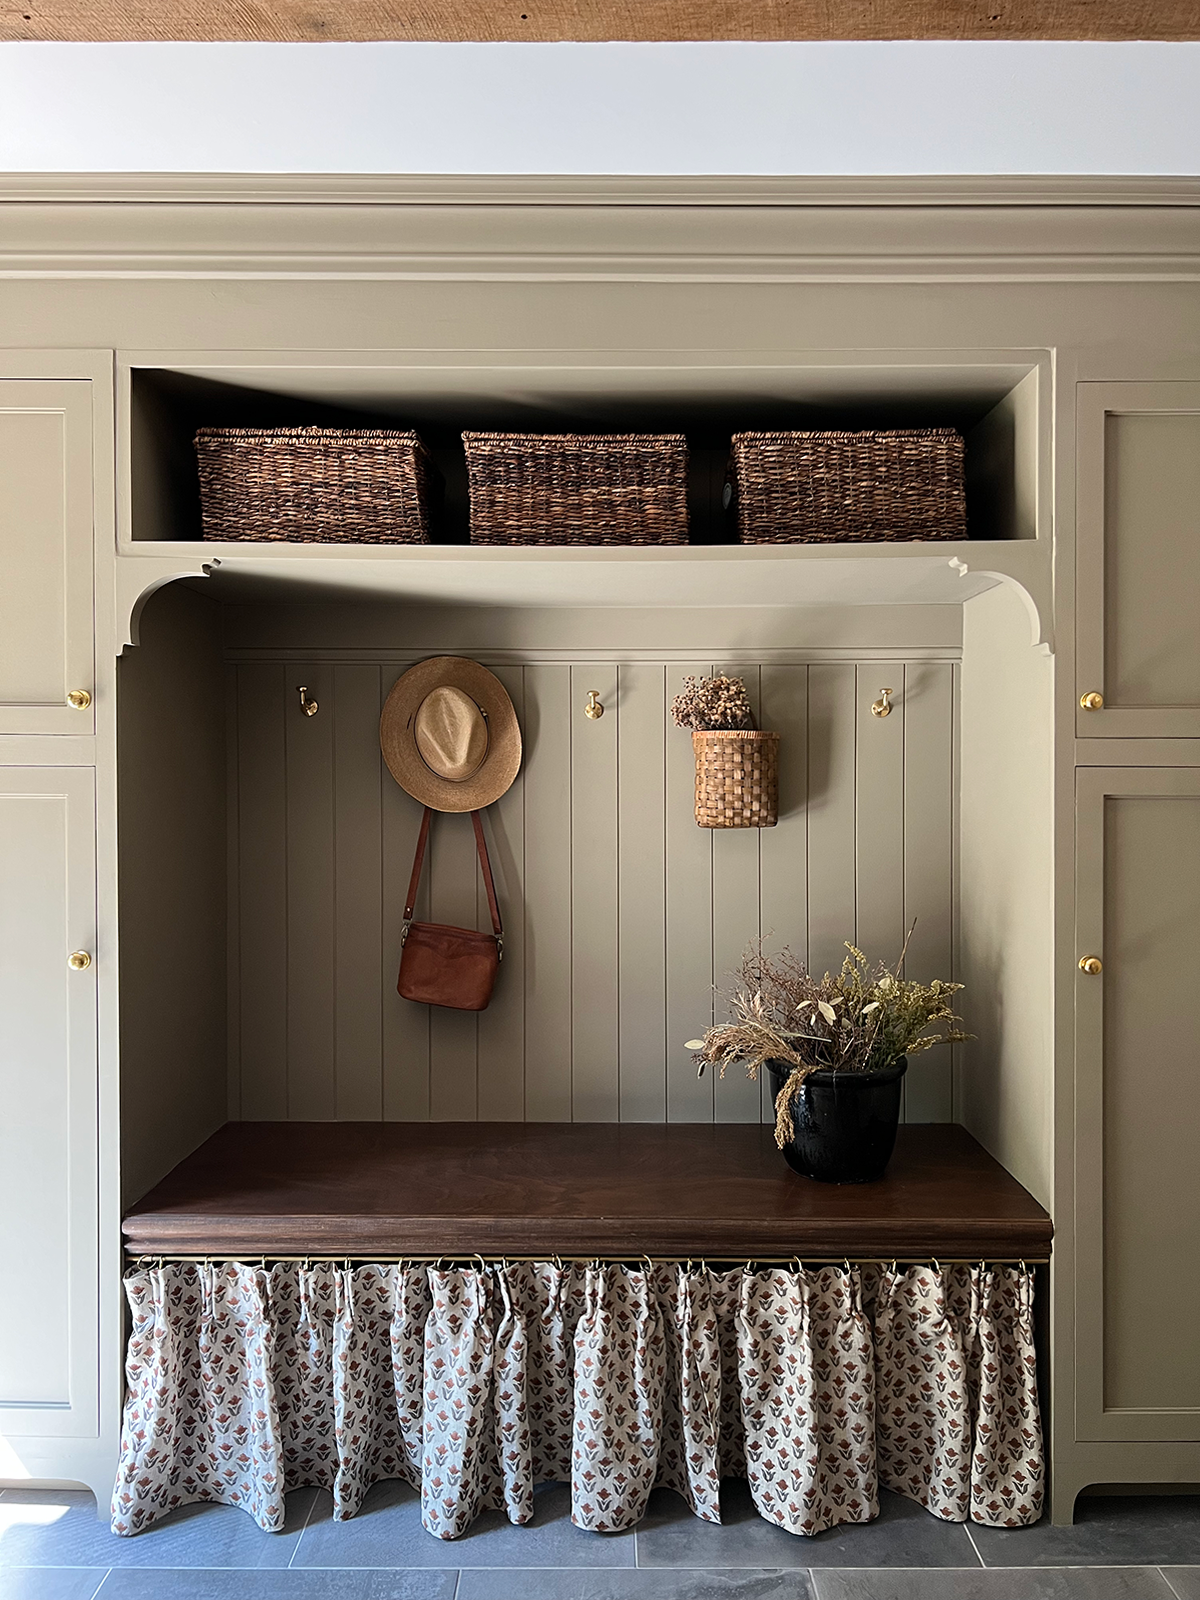
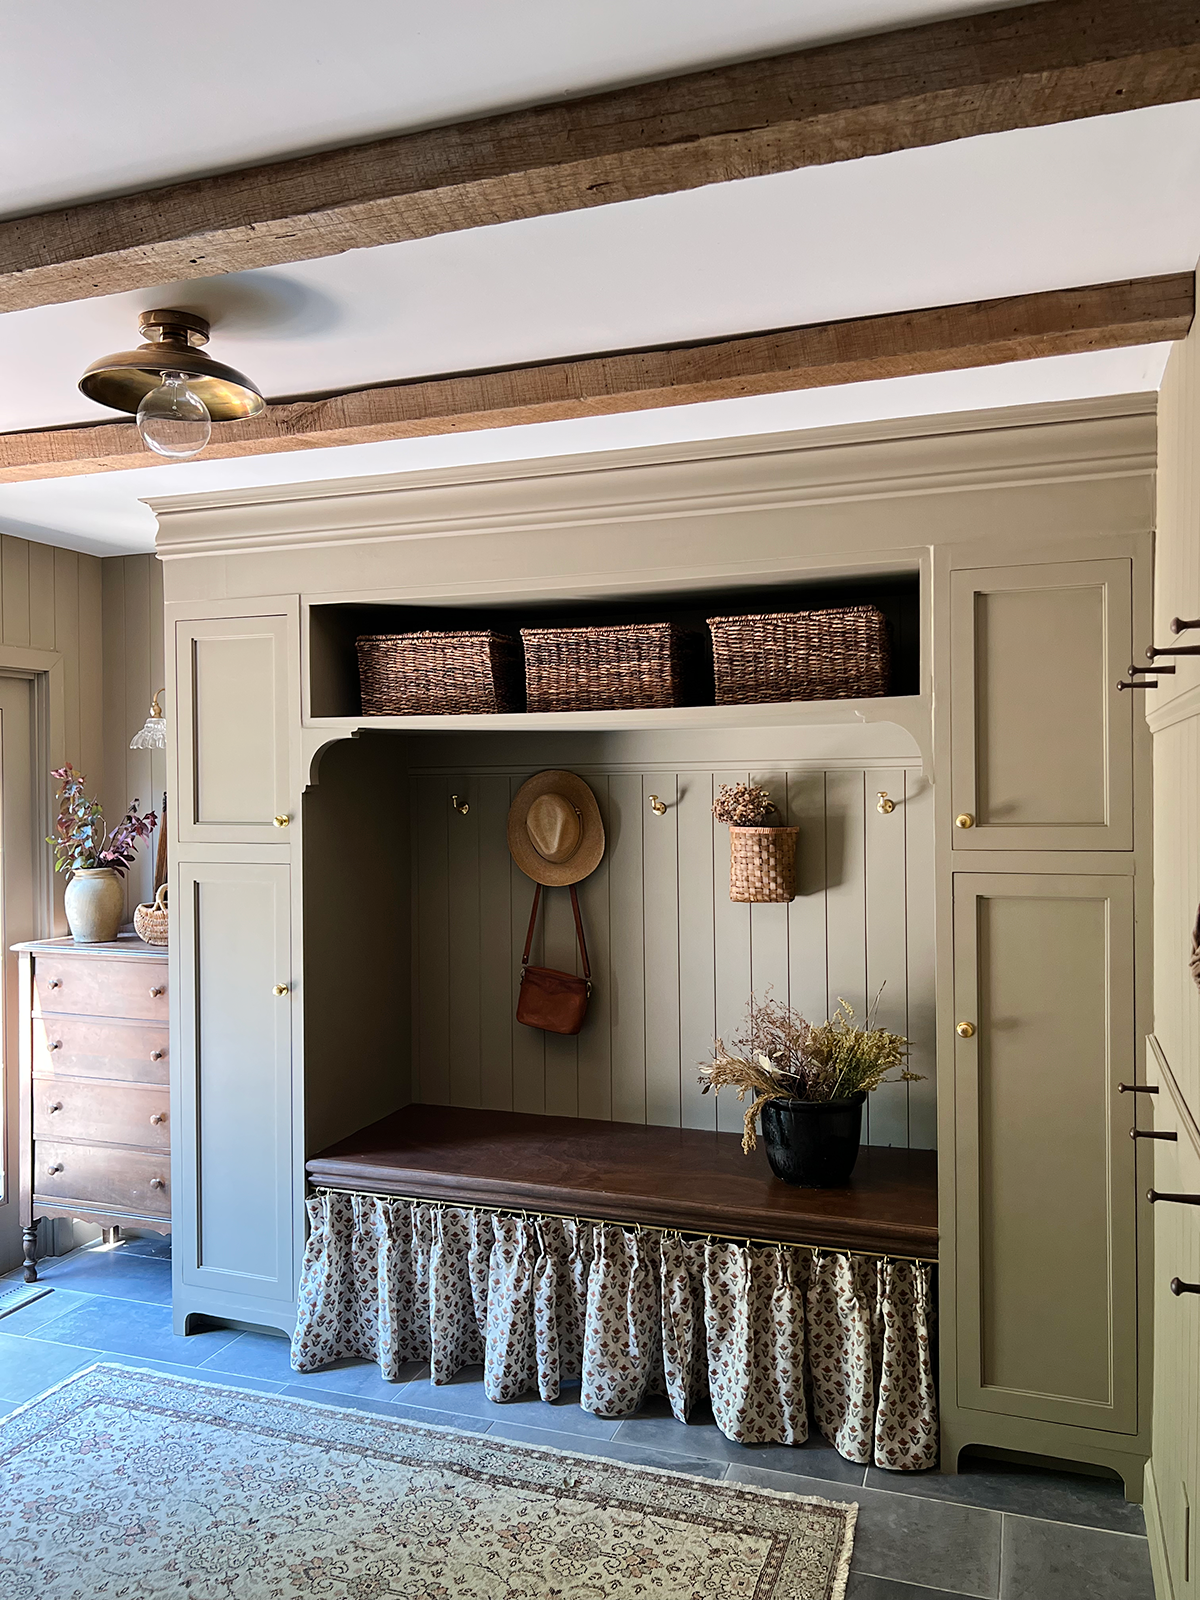
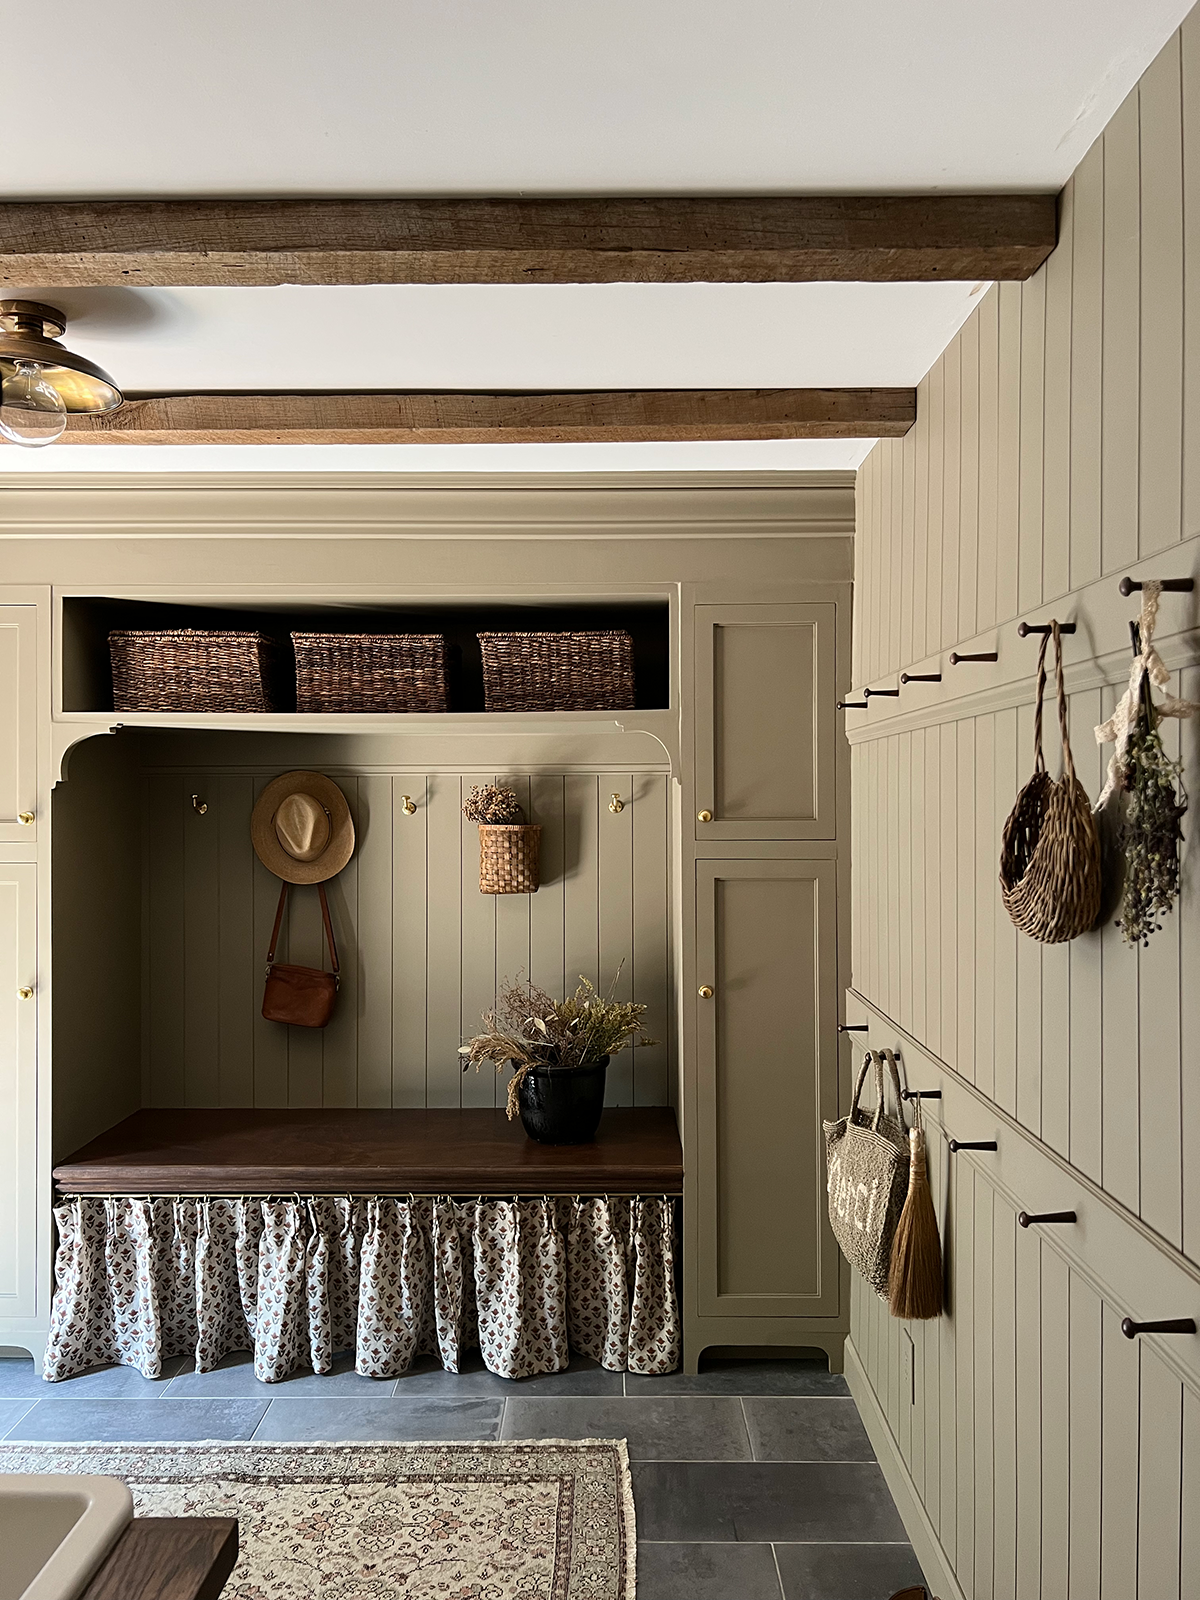
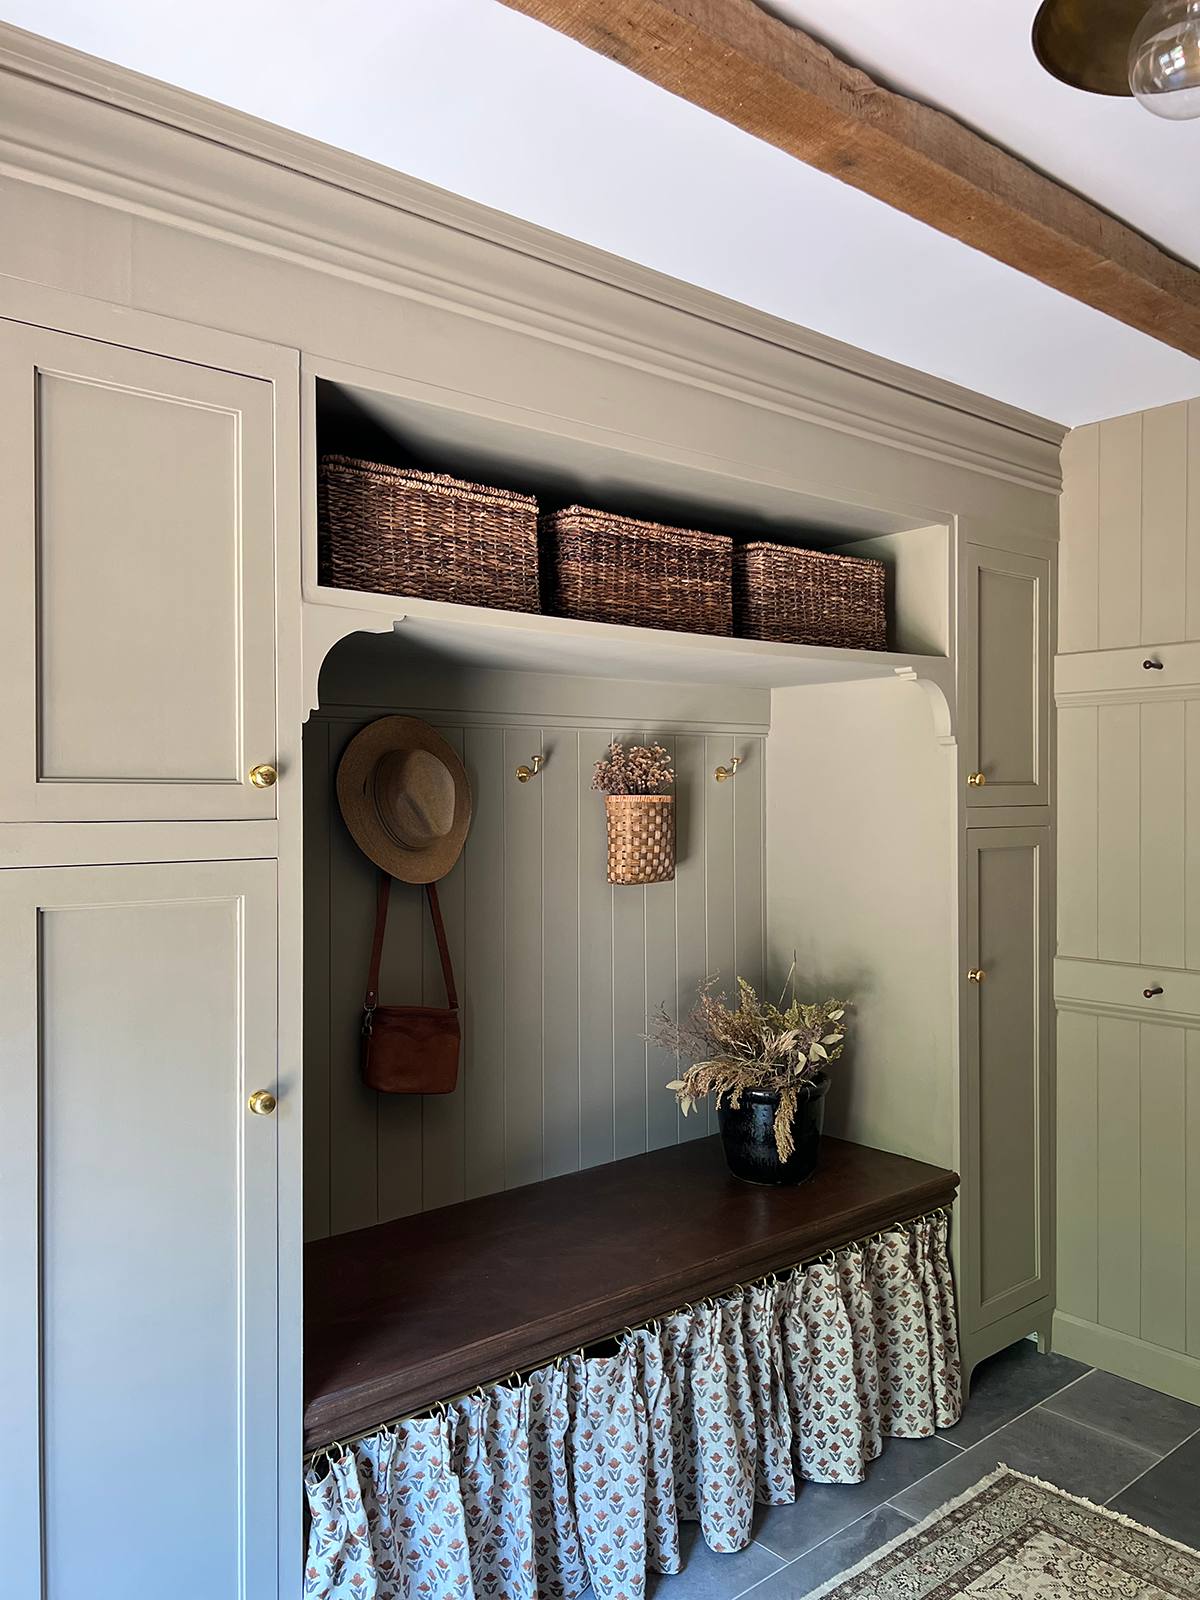
THE CABINETS: DIY BUILT INS WITH A CUSTOM LOOK
New cabinetry might be awfully costly – which we just lately discovered from our kitchen reno. So we knew we needed to be somewhat extra funds pleasant in right here. I needed the look of customized constructed ins so as a substitute of ripping all the pieces out, we simply constructed on high of what was already there. We stored the 2 tall cupboards which have been simply inventory cupboards from Lowe’s and added trim and moulding above them in addition to a shelf in between to tie all of it collectively.
It utterly reworked this aspect of the room and made it a lot extra practical with that extra storage above. And the crown moulding took all of it up a notch. Making our personal DIY constructed ins saved us a ton of cash.
One other replace we did was to alter out the cupboard doorways. They have been initially overlay doorways which implies they relaxation on high of the face body. I needed to alter them to be inset for a extra European look.
We ordered them from Quick Cupboard Doorways and sure they stay as much as their identify. They arrived tremendous quick and have been actually nice high quality. You may get them in plenty of finishes however we simply acquired them in paint grade since I used to be going to be portray.
I went with the Campbell Cupboard Door which has just a bit extra element than your normal shaker door and I am keen on how they appear.
Set up ended up being somewhat tougher than we thought, solely as a result of we measured the openings for our doorways earlier than we constructed all the pieces up across the cupboards. After doing so, the load of the brand new wooden shifted issues barely and the brand new doorways didn’t match completely.
All we wanted to do was shave the edges of a number of the doorways in addition to some components of the within fringe of the cupboard and we ultimately acquired them to take a seat inset and so they regarded so good! In case you’re ever on this state of affairs, a hand planer works wonders!

The opposite factor you’ll be able to add to your DIY constructed ins are customized toe kicks. It is a nice solution to make primary builder grade cupboards look extra customized. You’ll be able to create any form you need and simply connect them utilizing wooden glue. Particulars like this are what actually make an area stand out!
You’ll be able to see the method of creating our ornamental toe kicks on instagram. My good friend, Jenna, additionally has an excellent tutorial!
STORAGE
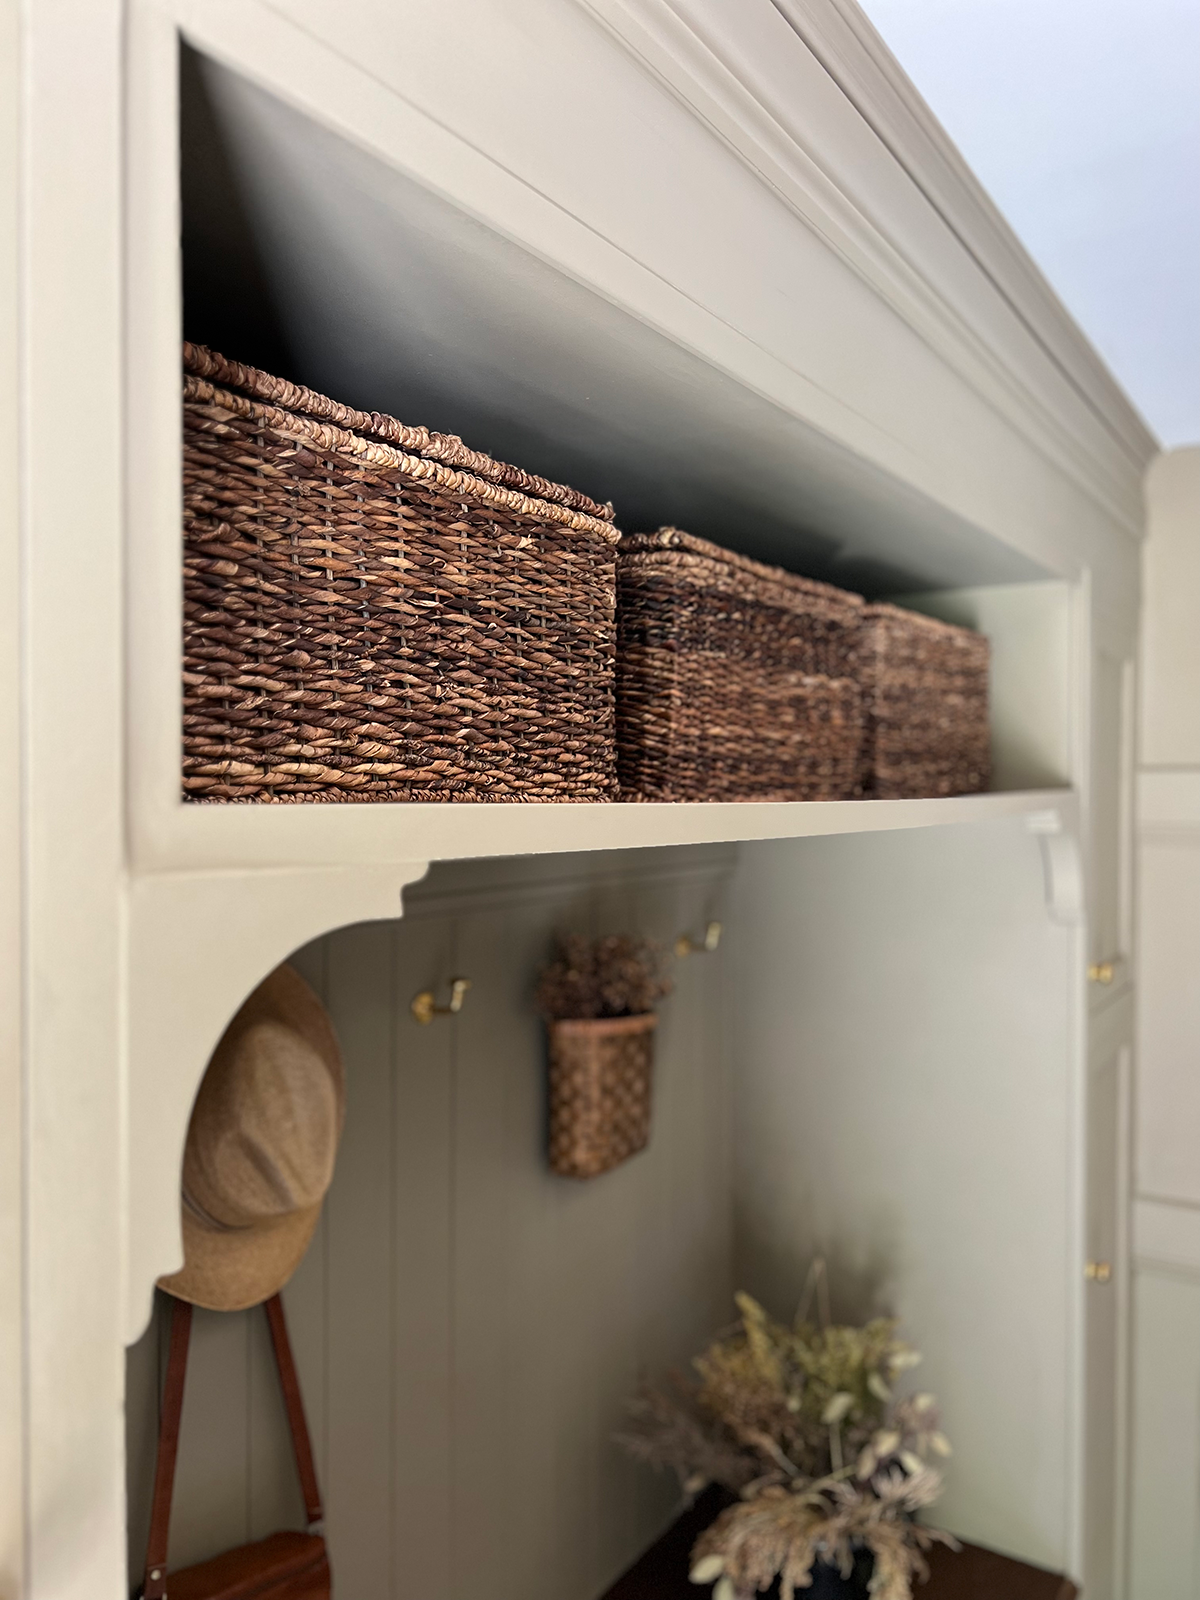
Storage was the principle factor we have been missing in right here and by including the area above the bench we have been in a position to put 3 huge baskets. We’ll use these for seasonal gadgets like boots and winter equipment and swim gear and seashore towels.
The shoe state of affairs was my least favourite half about this area earlier than. We simply chucked all of them below the bench with no rhyme or cause and it all the time was such a large number. I knew we wanted to handle this in a extra practical and delightful approach.
I’ve all the time liked the look of sink curtains and cute little cafe curtains on brass rods so I made a decision to make a shoe curtain! I shared my No-Sew Pinch Pleat Curtain tutorial already so you’ll be able to test it out in case you missed it however I’m obsessive about the way it turned out!
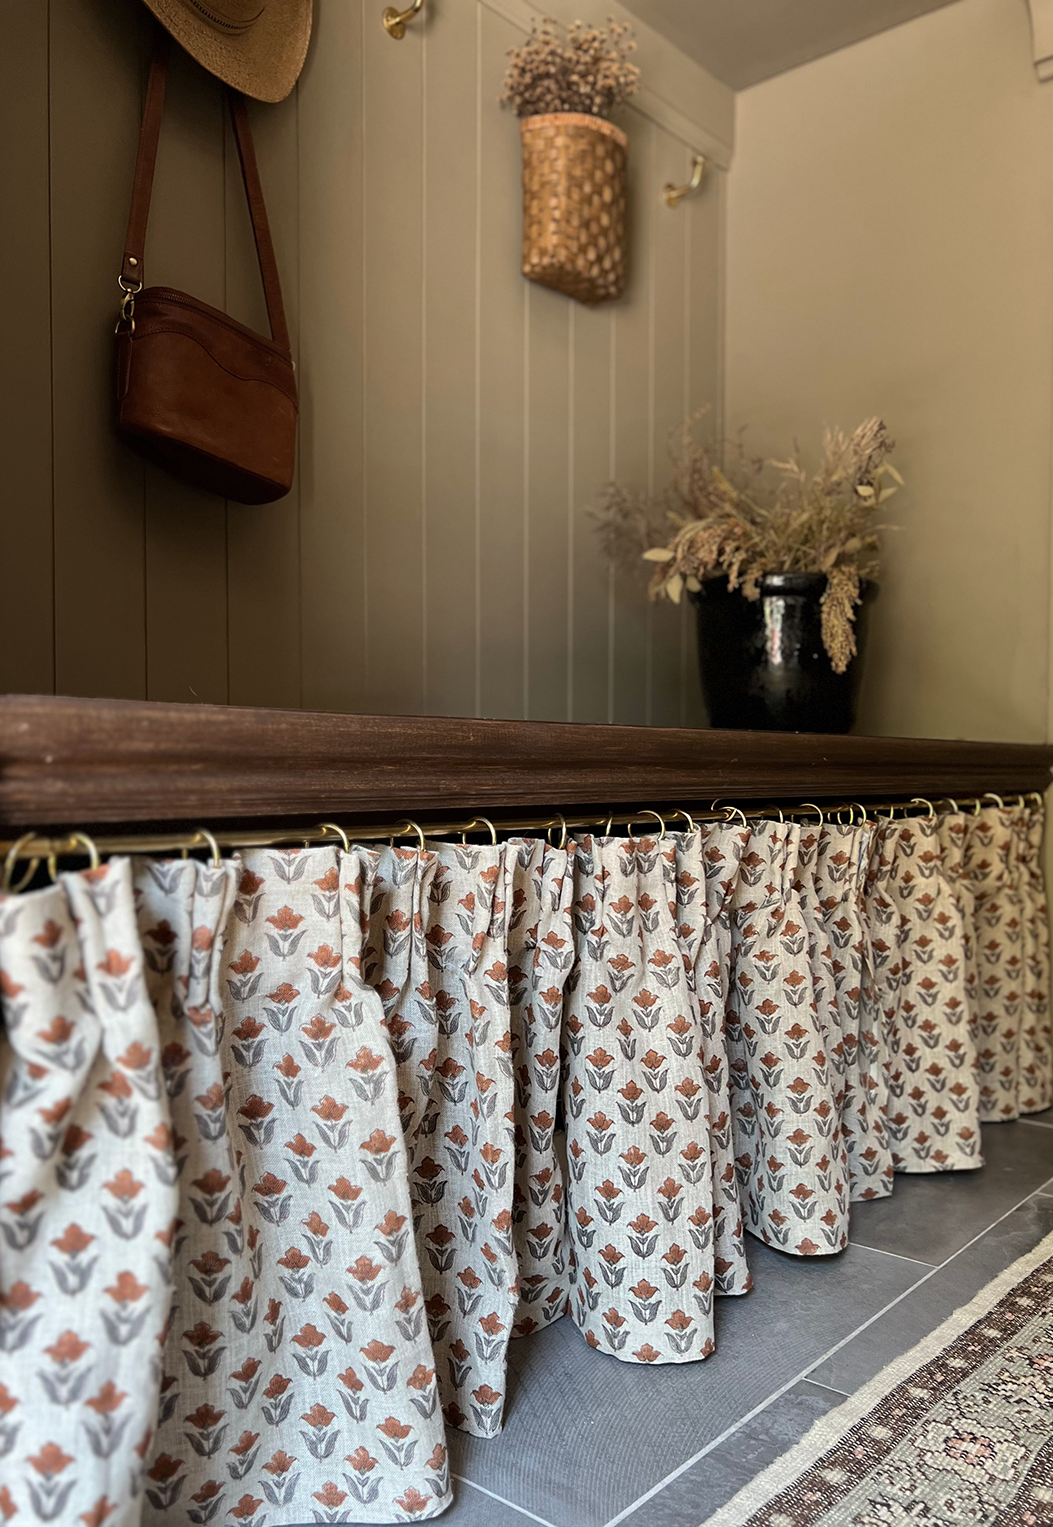
The beautiful floral block print cloth paired with the brass rail and hooks makes my coronary heart so blissful.
I ended up creating 3 small curtains and this manner there are extra entry factors to get to our footwear. Behind the scenes I put two small shoe racks which can be two tiered so it offers us loads of room. Now even when issues get somewhat messy, you’ll by no means see it ? It’s the proper hidden shoe storage answer!
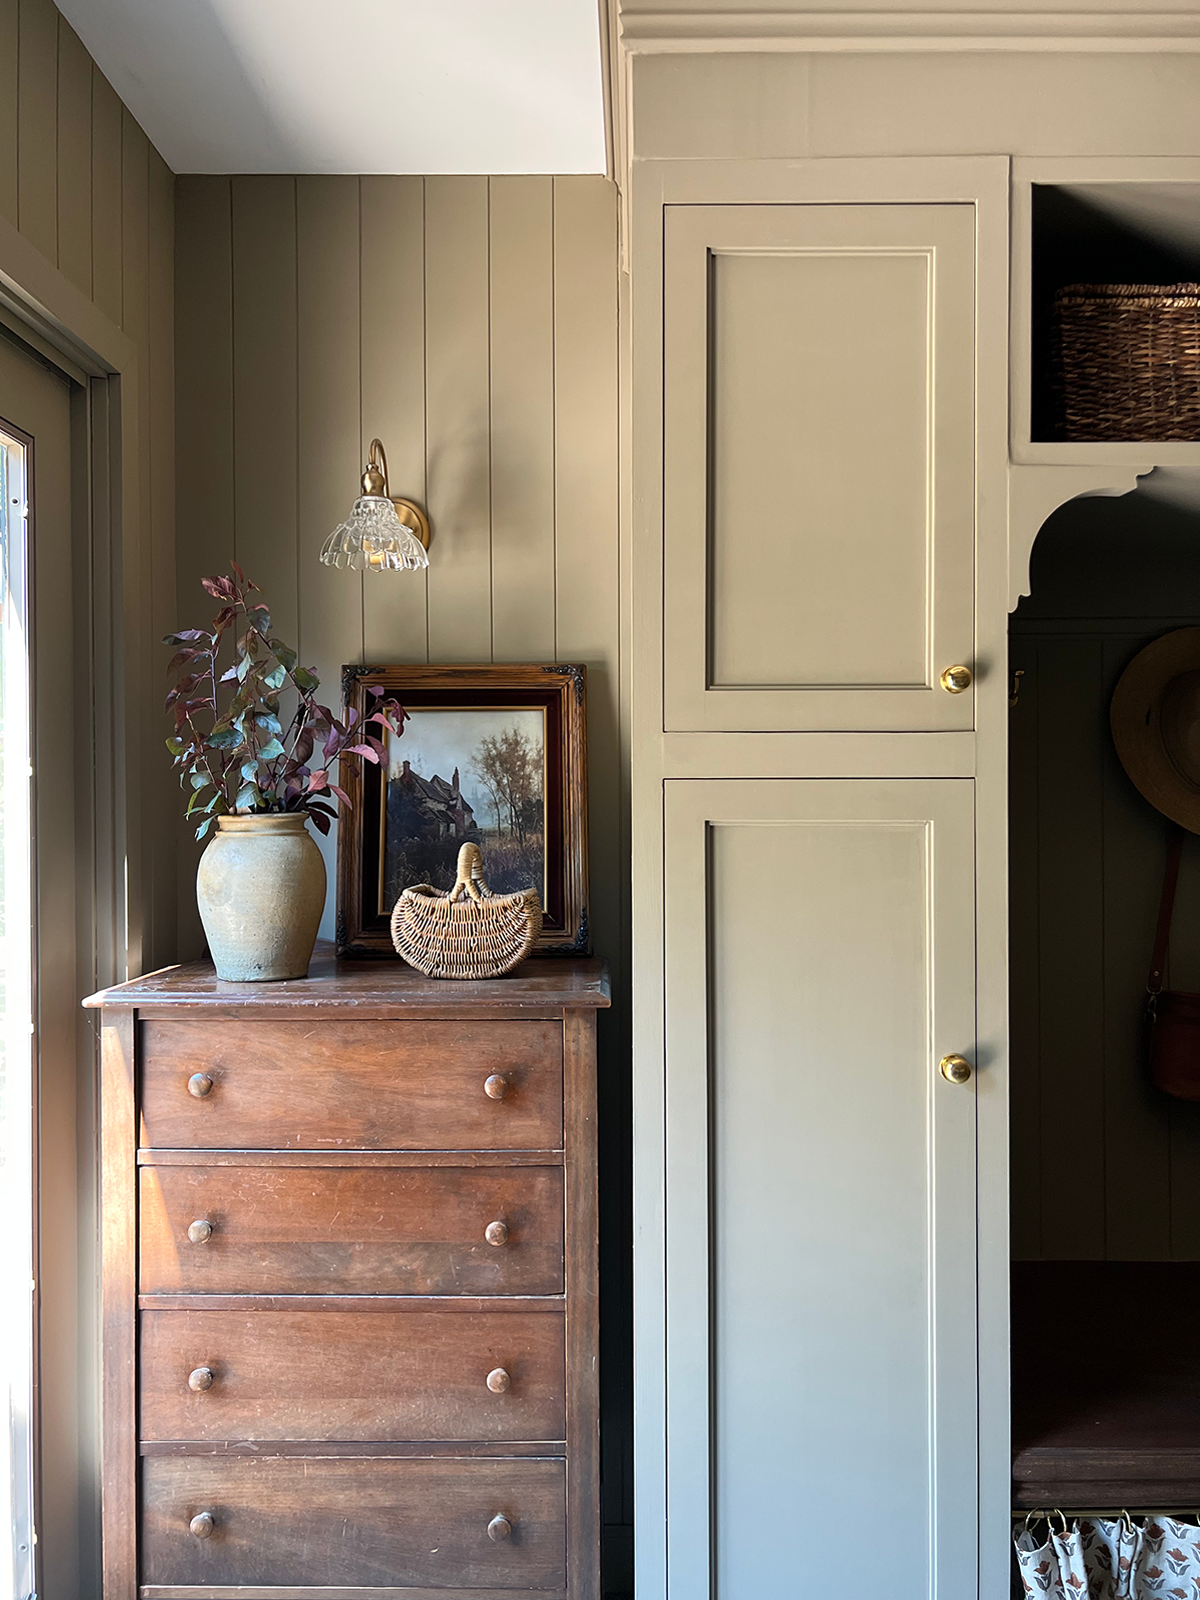
Since we have now sliding glass doorways in right here, the cupboards can’t sit flat in opposition to the wall on the left. It created somewhat nook that I ended up discovering the proper little vintage dresser for. It gave us one other space of storage the place we will put a number of the children footwear they’re not carrying each day, paper towels and some other random issues we have to!
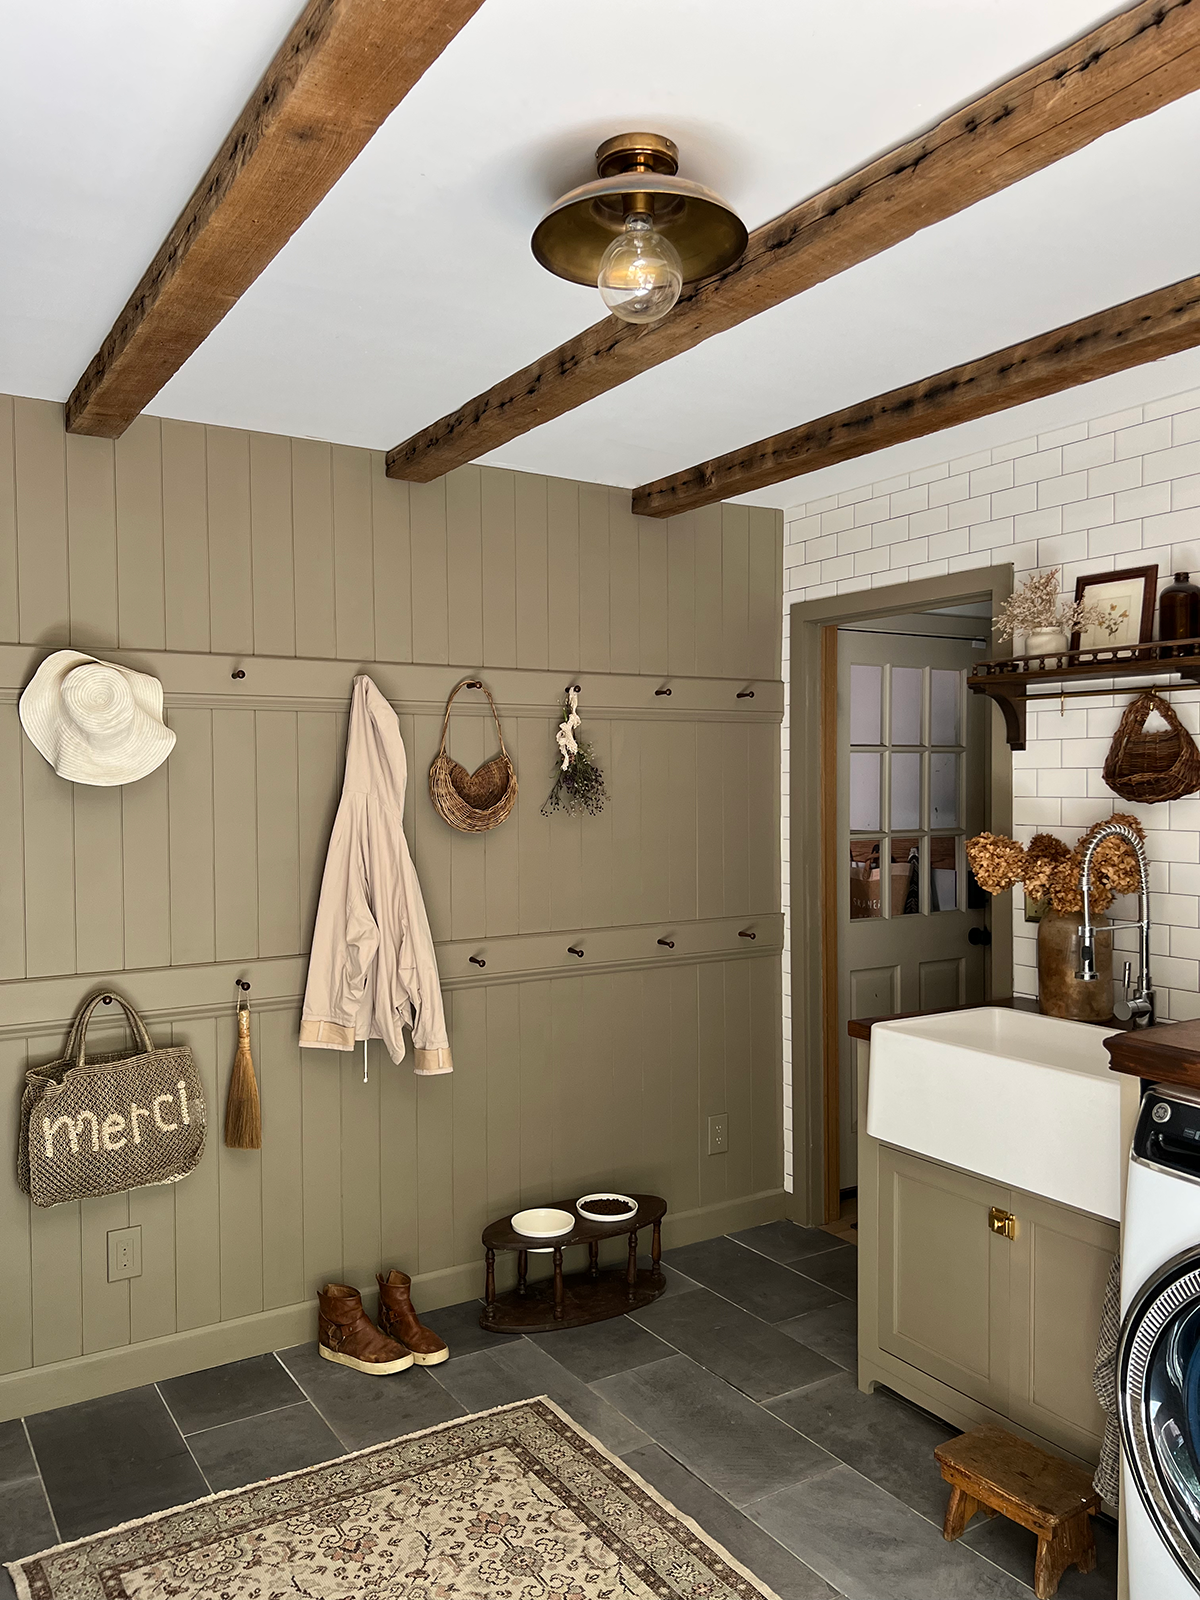
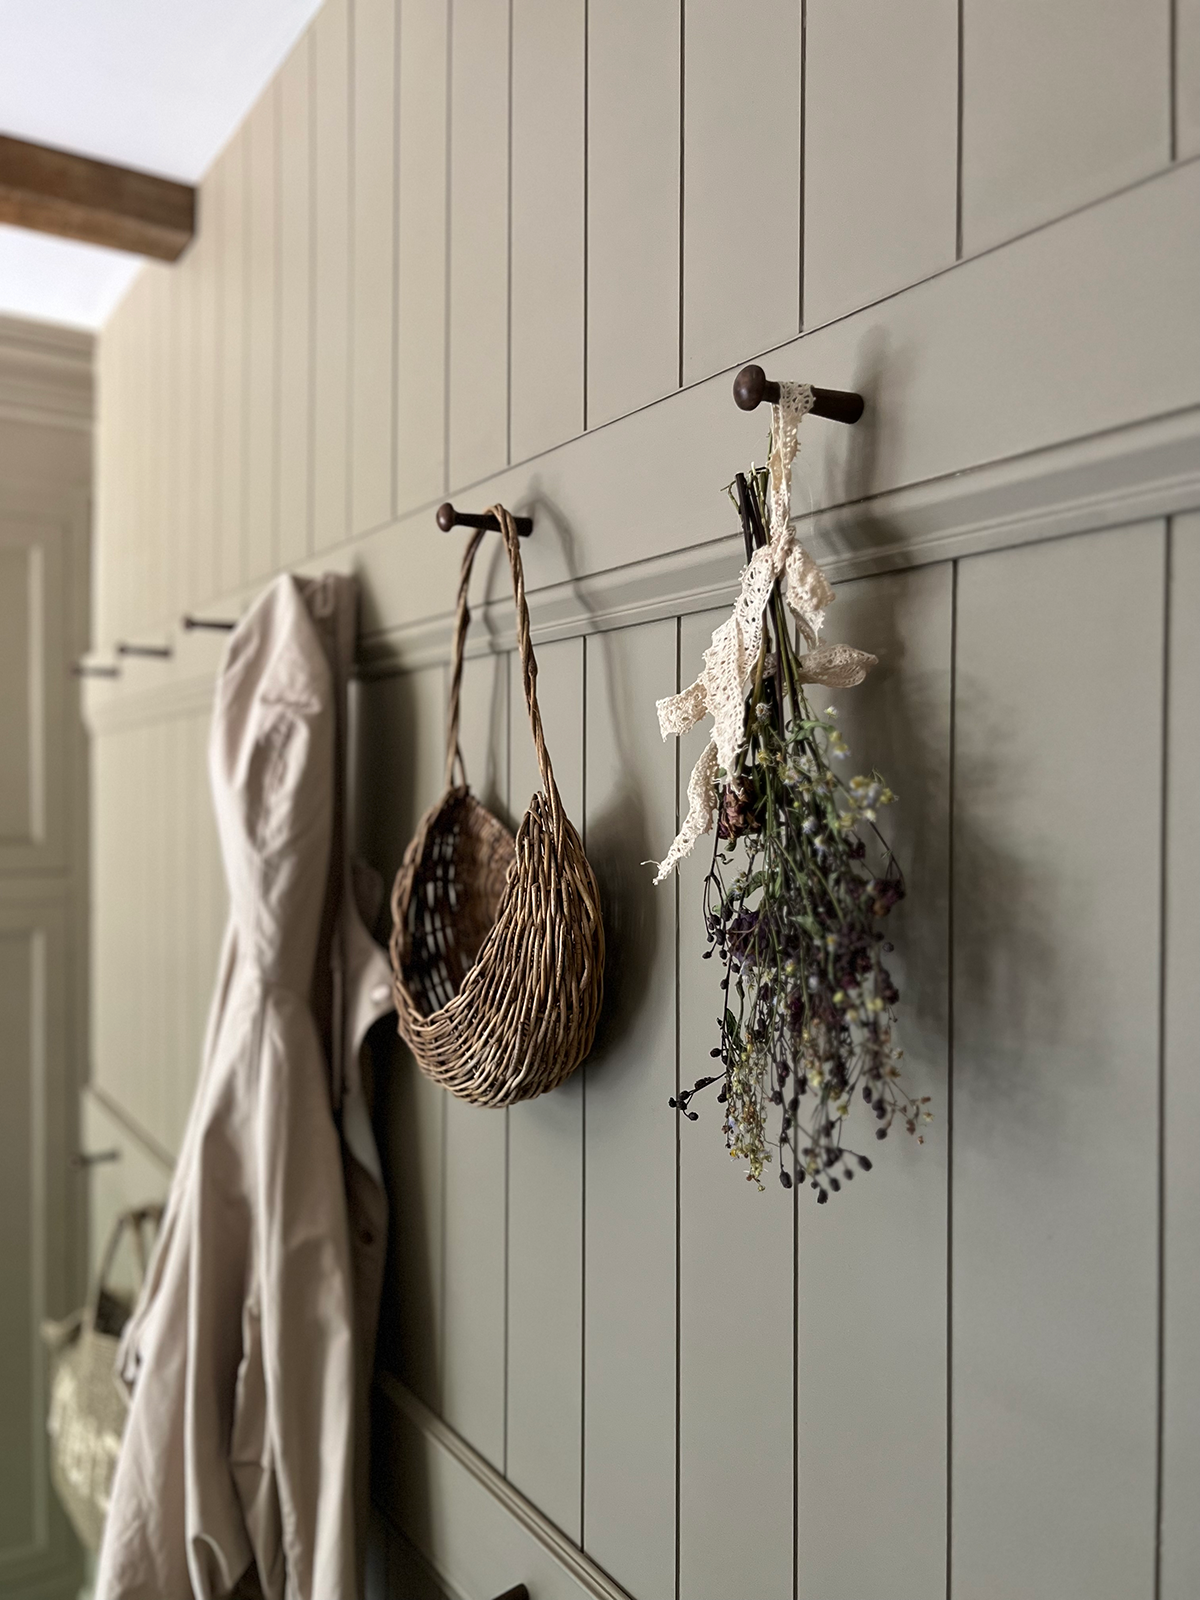
THE PEG WALL
This was one other space that was not getting used to its most potential. I had one tiny little drying rack on this wall that hardly ever acquired used. And for the reason that children can’t actually attain the hooks above the bench I made a decision to show this into a large peg wall.
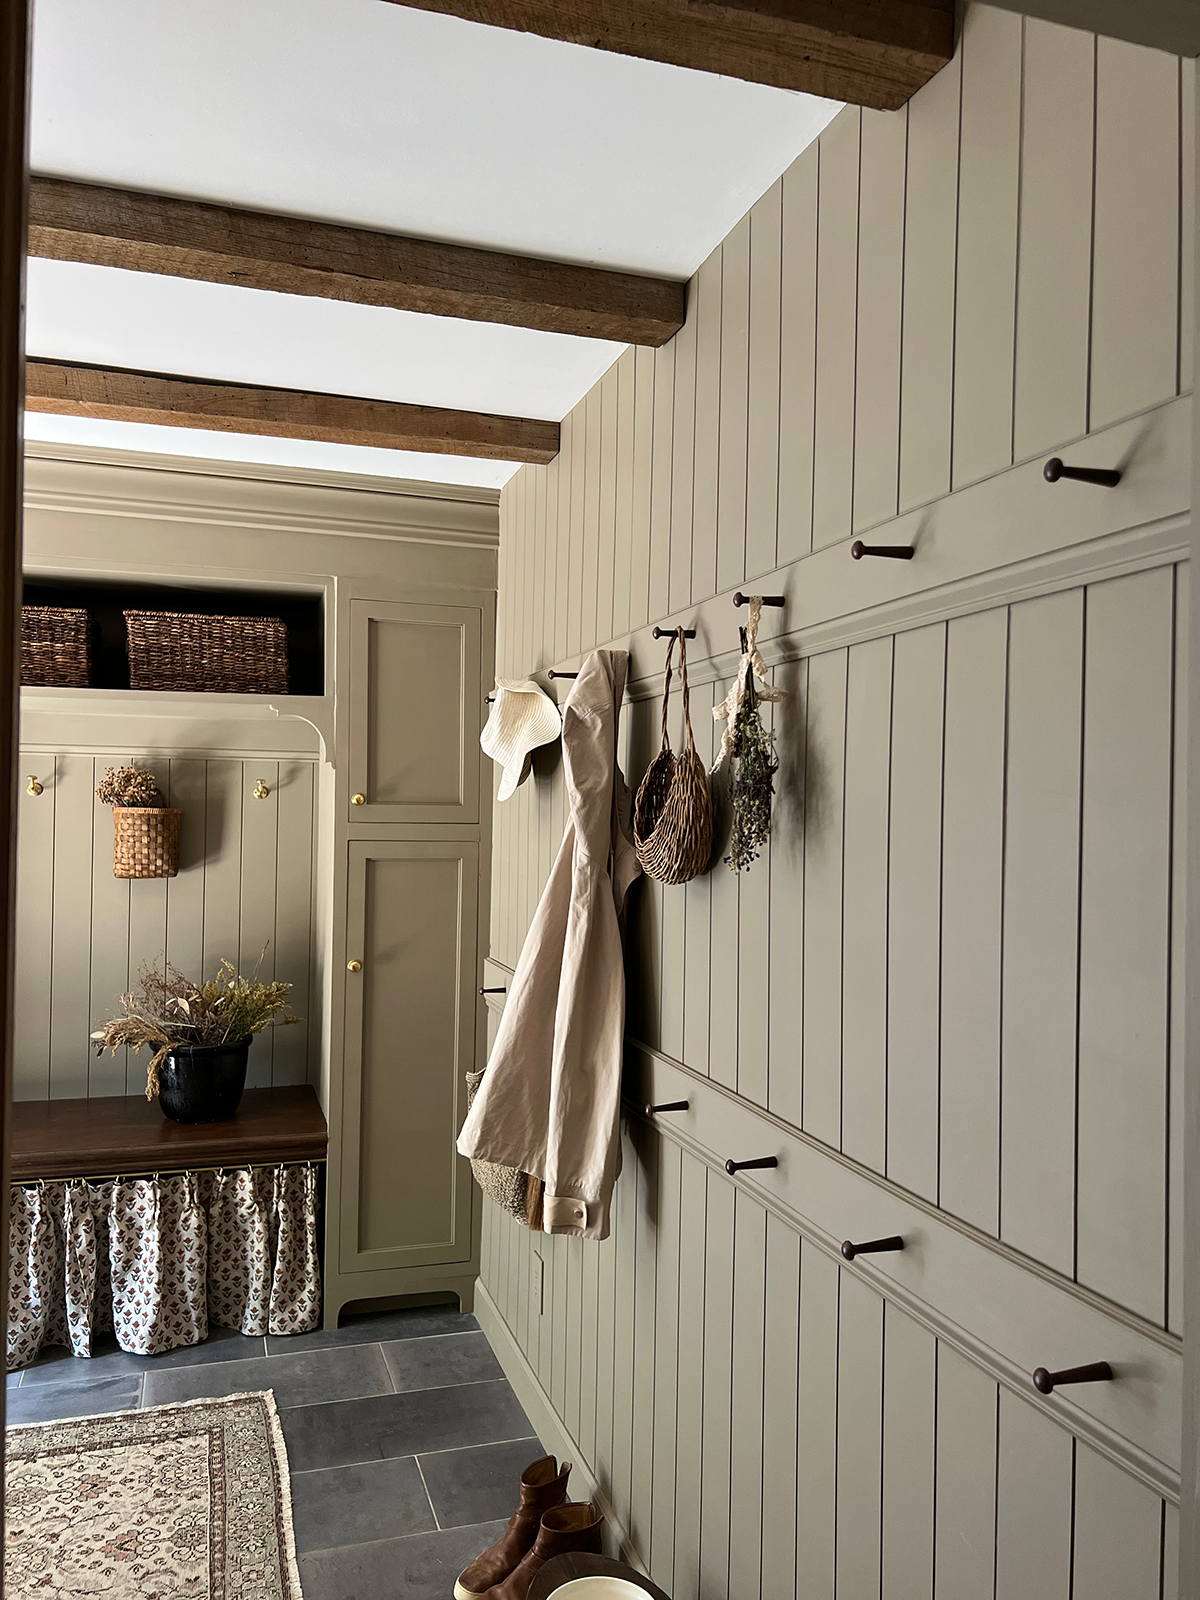
As quickly as I did, I wanted we had executed it from the beginning. It created such a sensible area for us! Now the youngsters can attain all the underside hooks and dangle up no matter they should. We are able to dangle garments to dry, further coats, purses, luggage – all of the issues!

So as to add some visible curiosity I used items of baseboard to screw the pegs into after which determined to stain the pegs for some distinction in opposition to the paint.
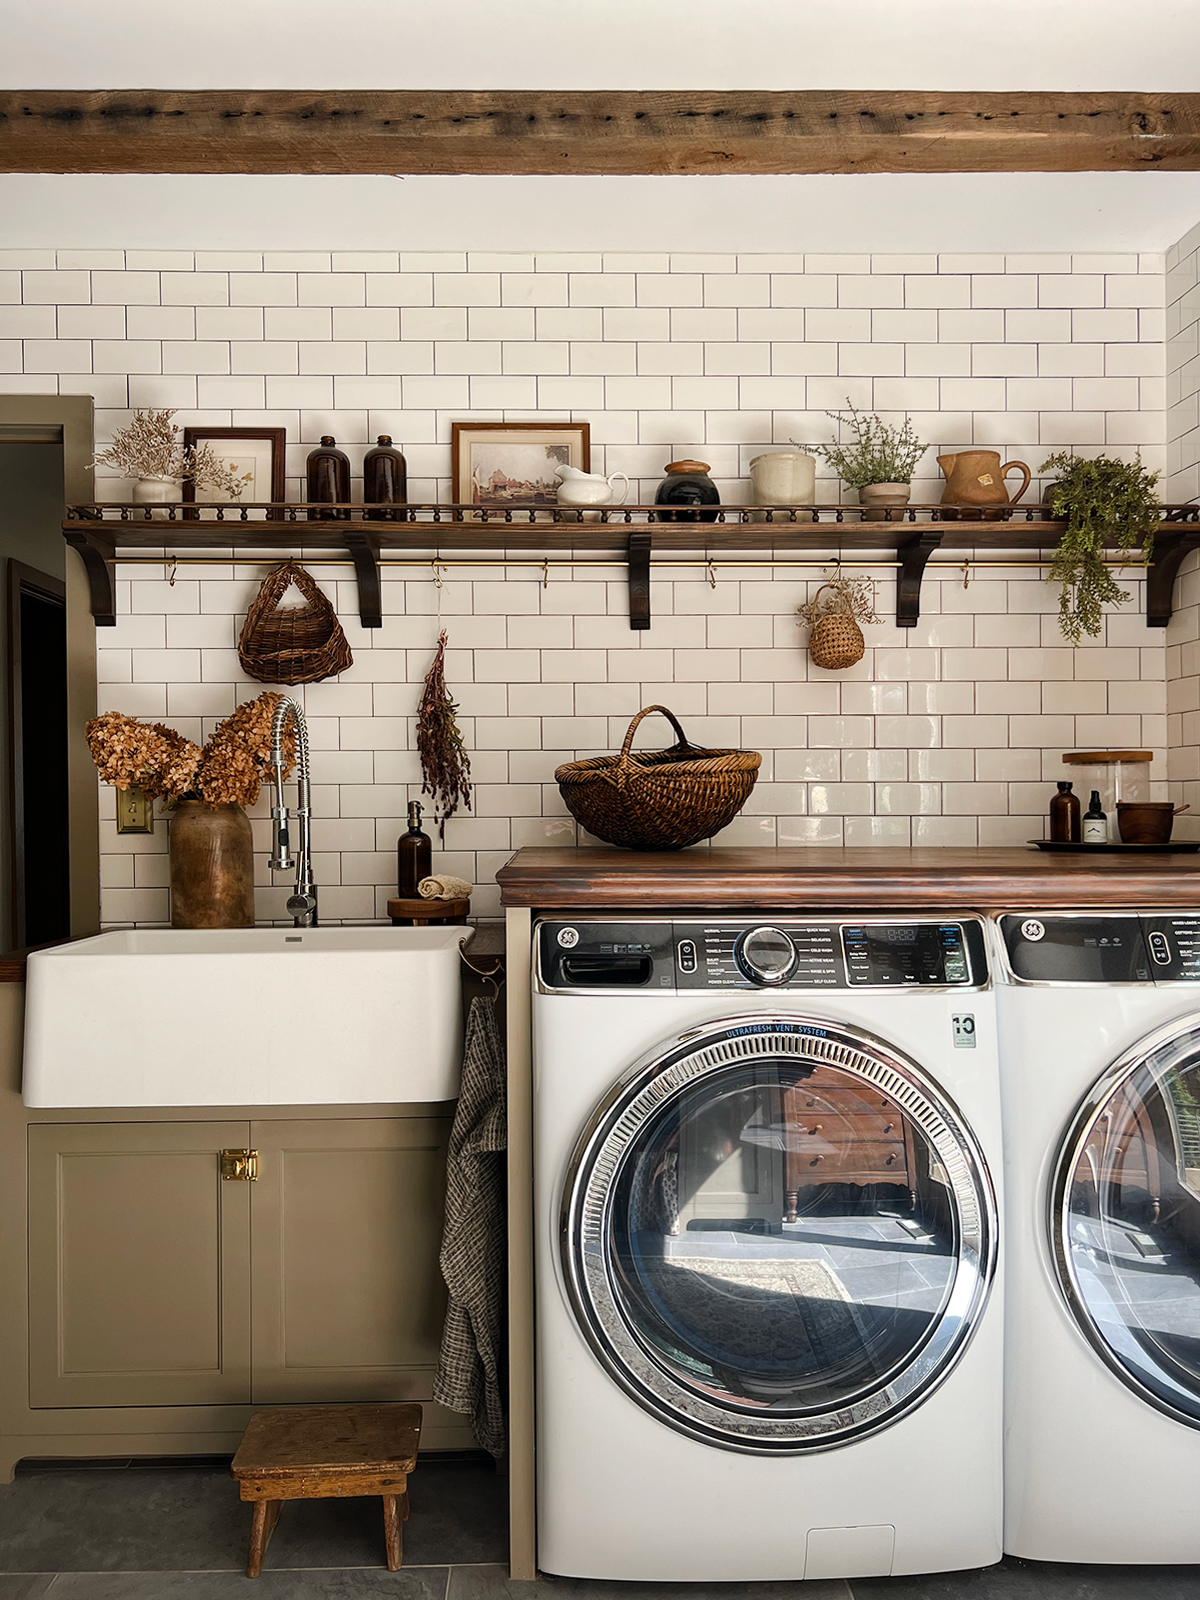
THE LAUNDRY
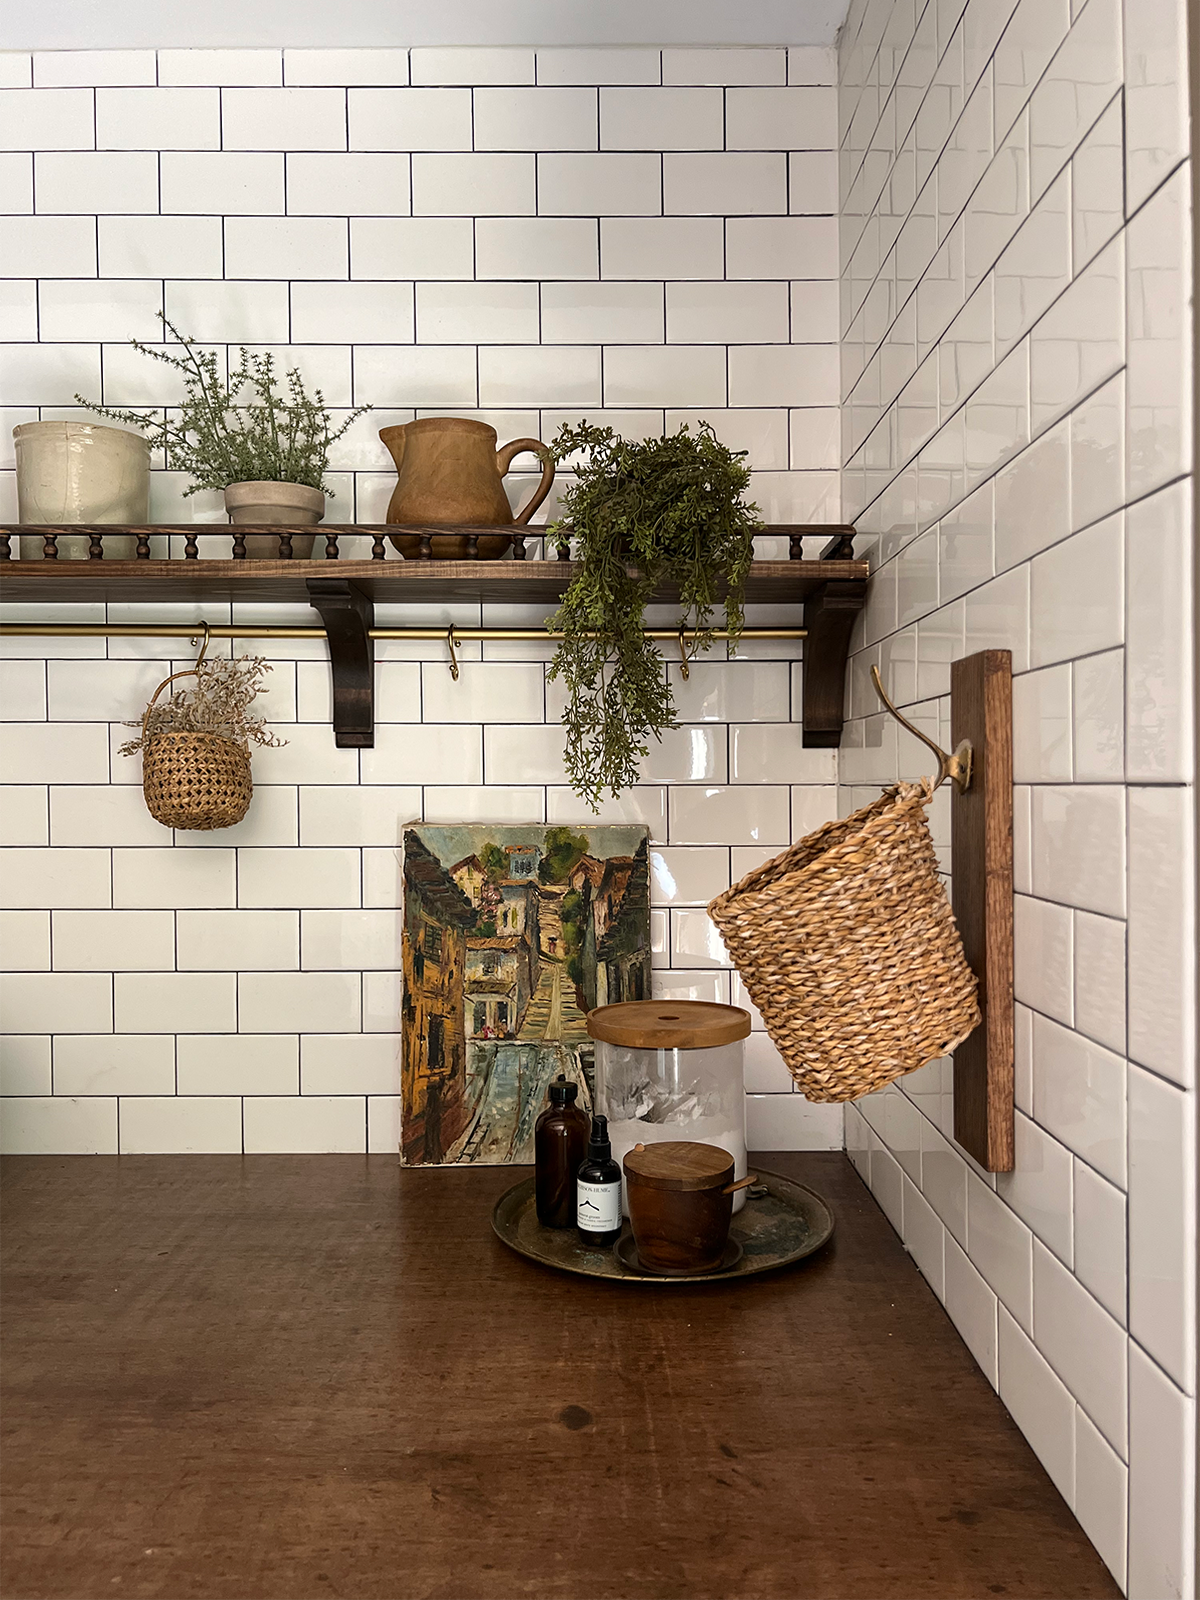
Actually not an excessive amount of modified on this aspect apart from the shelf. The primary one we hung up was small and didn’t refill the entire wall and simply appeared type of random. I don’t know why I went with that dimension!
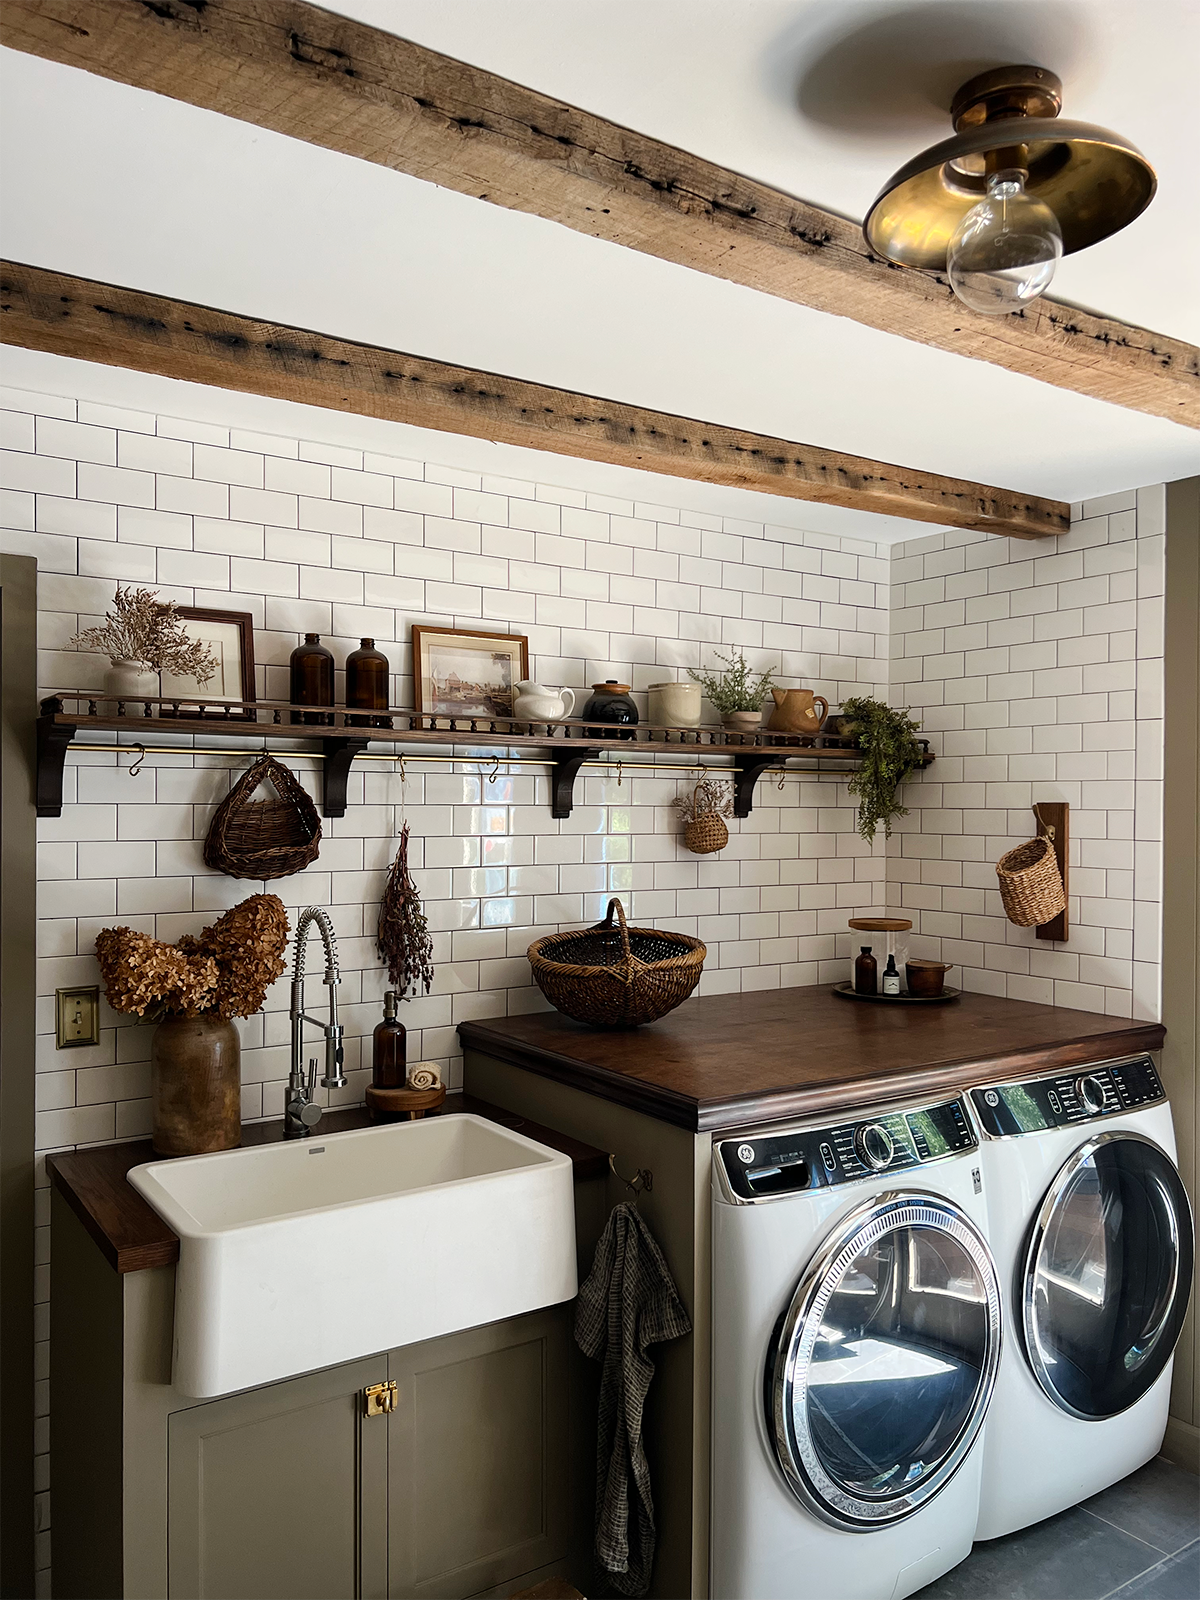
I knew having it go throughout the entire wall would make it really feel extra like part of the area and likewise give me extra room to place issues. However as a substitute of simply having a high shelf, I additionally added a brass rail under to hold issues from. This made it much more practical and likewise added one other lovely aspect to it.

You’ll be able to learn extra about how we constructed the shelf and get the entire tutorial.
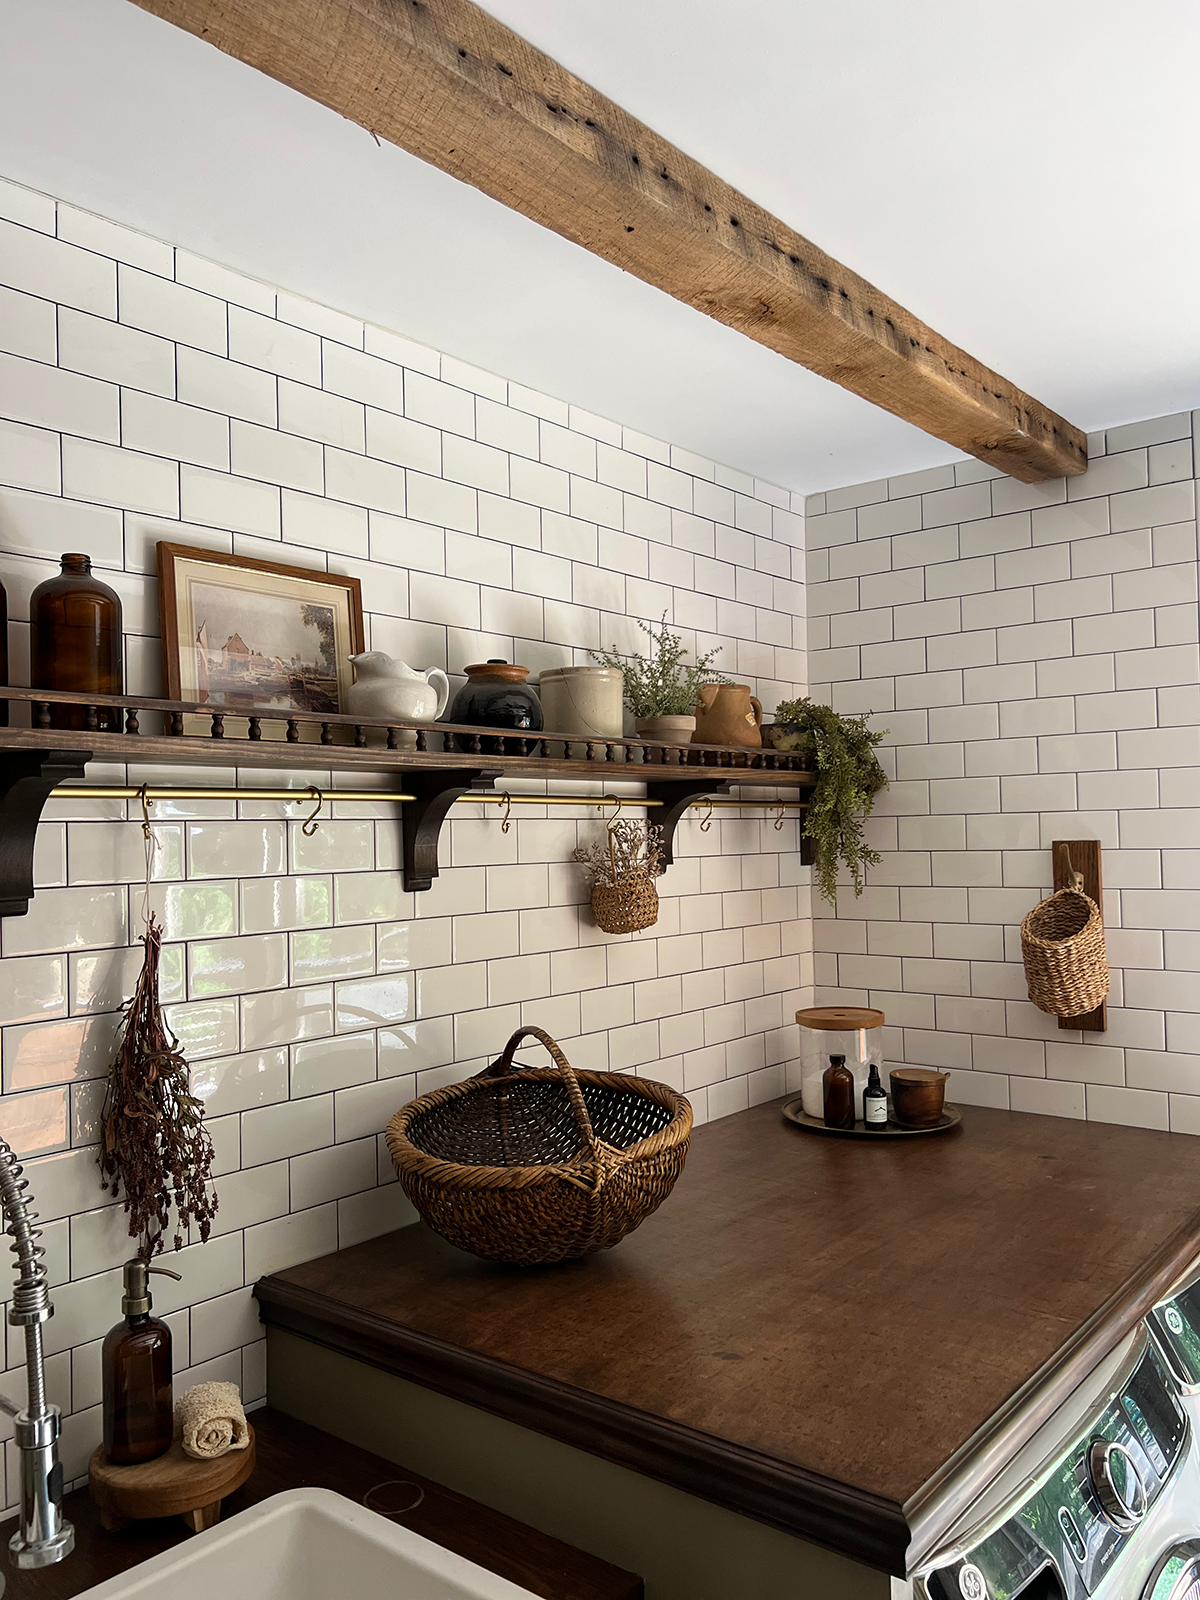
The counter on the washer and dryer was an outdated door slab we bought at a warehouse for $20. It was nonetheless in good condition however I needed to darken the stain so I sanded it down and gave it a recent coat.
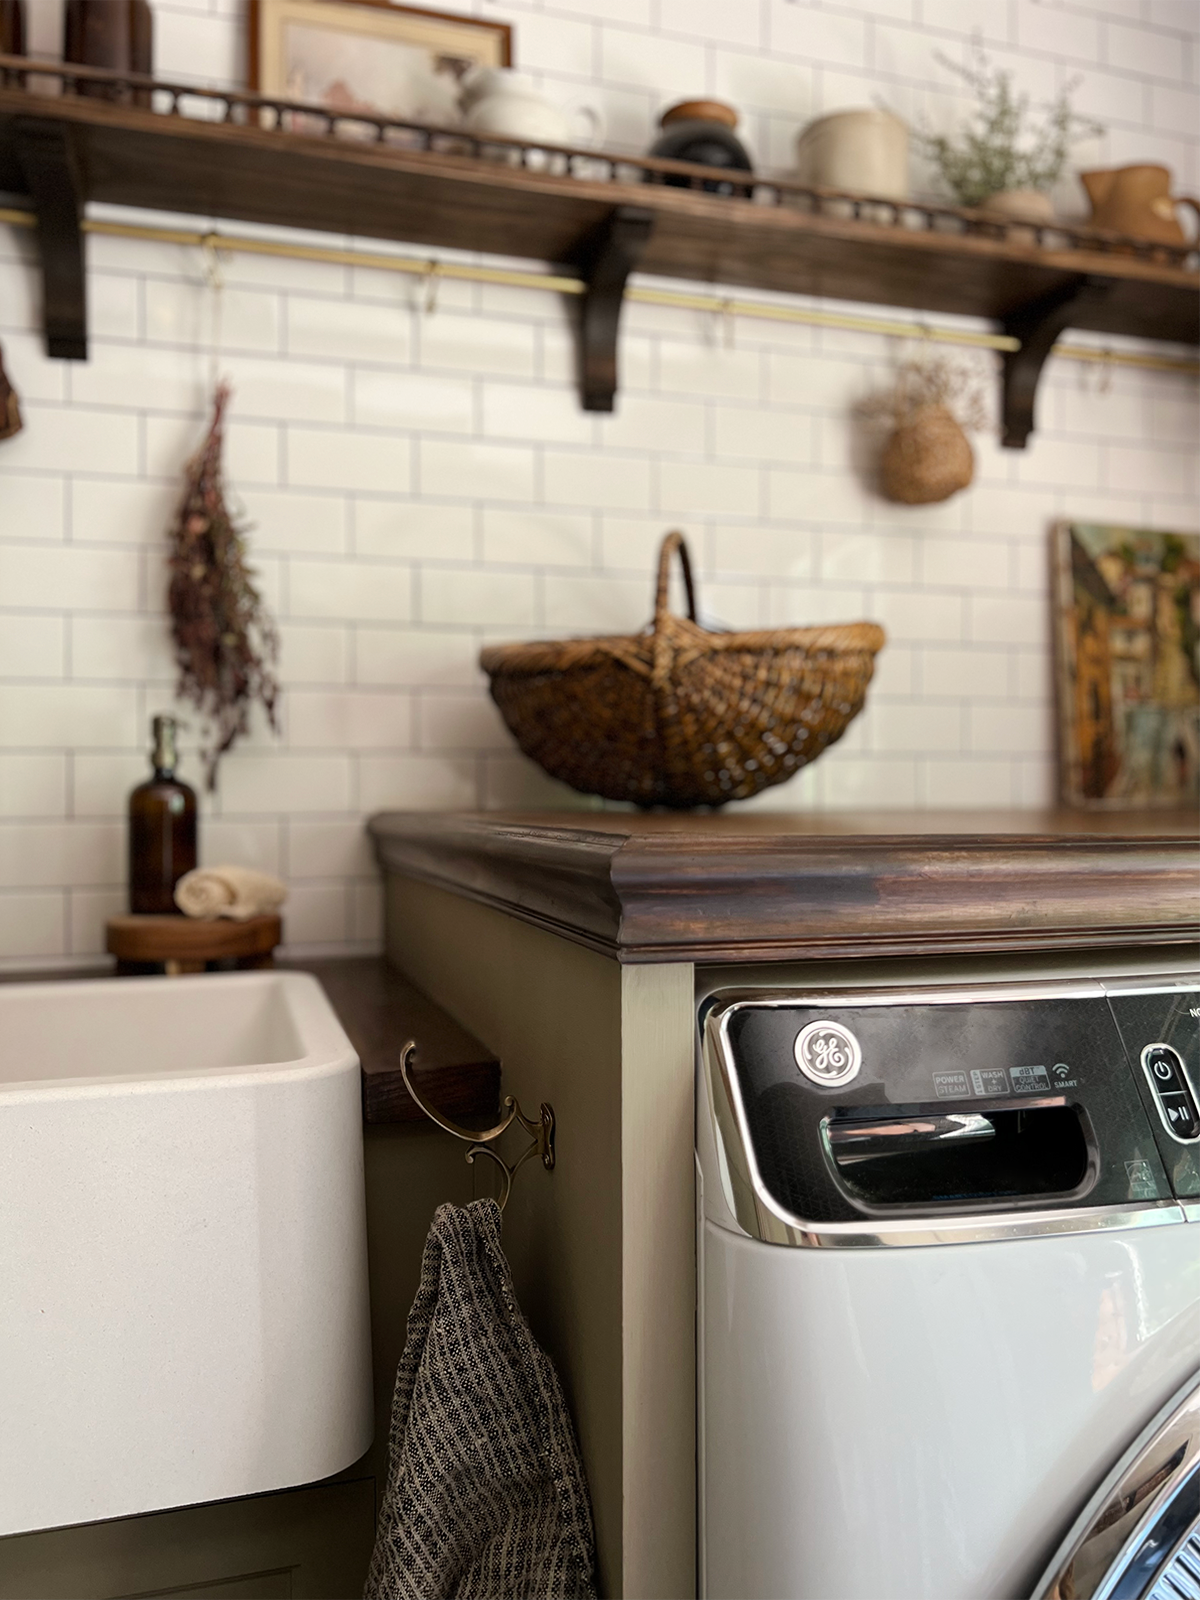
To make it look somewhat extra visually interesting, I added some trim across the edge which was such a easy addition, however utterly reworked the look.
THE BEAMS
One other objective for this area was to infuse as a lot character as potential. A method we did that was by including rustic beams to the ceiling. They’re from an outdated barn that collapsed 5 minutes from our home and I really like that they carry in somewhat piece of native historical past to this room.
Since they’re solely 3 inches thick we simply screwed them proper into the studs utilizing countersinking screws. The holes are hardly seen!
THE DETAILS
The main points of an area are all the time my favourite and I had a lot enjoyable styling and adorning this room! It undoubtedly has a unique vibe now however it’s a testomony to how my type has developed over time and the totally different skillsets we’ve discovered.

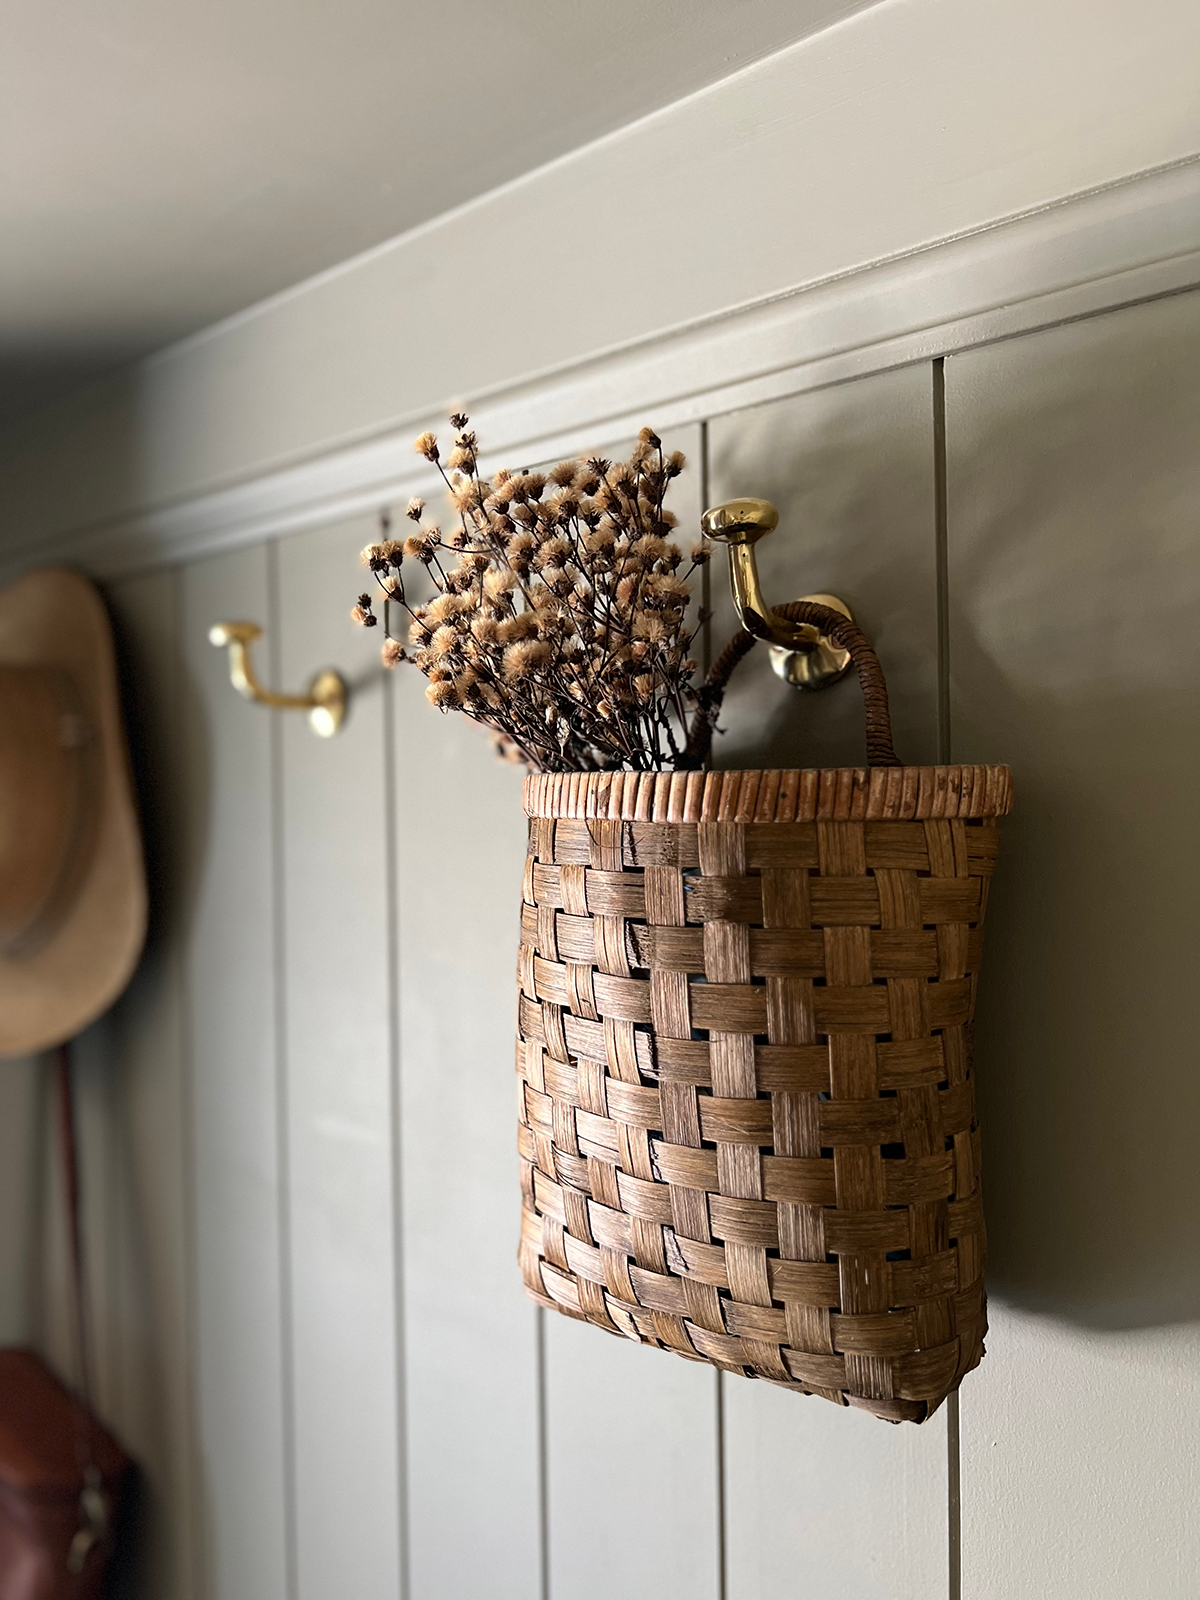
We hung these lovely brass hooks above the bench which is the place Dan and I put most of our issues. The stained peg hooks give the youngsters loads of room for all of their bookbags and coats.
I switched out the rug for a brand new certainly one of a form from this classic rug store on etsy. Utilizing classic rugs in right here has all the time served me properly since they disguise grime and stains properly however are straightforward to scrub too. You’ll be able to learn extra about how I maintain my classic rugs clear.
The knobs on the cupboards are unlacquered brass and l Iove that they’ve somewhat backplate. A small element that makes them somewhat extra distinctive than a stand alone knob.
For the sink cupboard, I used the identical unlacquered brass latch that I used on the nook cupboard in our kitchen.
I stored our lint basket the identical as a result of I adore it a lot and it’s labored so properly. That is the place all of the dryer lint and little sprinklets of rubbish I discover in everybody’s pockets goes. It’s approach cuter than having a rubbish can someplace!
It’s so enjoyable to look again on the evolution of our laundry and dirt room and see how a lot we’ve grown as DIYers and me as a designer. Sure, the room was completely high-quality earlier than however paying nearer consideration to the smaller particulars actually elevates an area. I by no means wish to cease studying and rising and updating this room exhibits that it’s value it to make these adjustments and create one thing you like.

SOURCES
Paint Colour: Mouses Again by Farrow & Ball
Shiplap Panels
Cupboard Doorways: Quick Cupboard Doorways
Flooring: Sintesi Atelier Porcelain Tile within the Colour Fumo, Dimension 12×24
Subway Tile
DIY No-Sew Pinch Pleat Shoe Curtain
GE Entrance Load Washer
GE Entrance Load Dryer
Floral Block Print Material
Brass Curtain Rod – Customized made out of Pepe and Carols
DIY Shelf with Wooden Gallery Rail
Baskets
Flush Mount Gentle
Sconce Gentle
Sink
Brass Knobs
Brass Hooks
SHOP THE ROOM
Associated
[ad_2]
Source link
